


This article was written on Pragma Engine version 0.0.94.
Building Unique Instanced Items with Plugins #
In the second article of the Instanced Items series, we’ll continue where we left off and learn how to write an InstancedItemPlugin. This plugin will use our previously defined custom content in protobufs (Gear and GearSpec) and JSON files (Copper Sword, Bronze Breastplate, and Iron Helmet) to build custom content for unique, individualized instanced items.
If you haven’t already, make sure you’ve read the first article in the Instanced Items series to learn about the instanced item workflow and to have the required custom content for this guide in Pragma Engine.
For this tutorial, we’ll create an InstancedItemPlugin to build custom content for gear-related items and test our plugin by running service calls with Postman.
Understanding Custom Plugins #
Custom plugins are a key, powerful tool in constructing your own logic and features with Pragma Engine. Whether you’re using Pragma Engine’s pre-existing services or creating your own entirely, you can use custom plugins with content from protobufs and JSON files to design your distinct backend workflow.

The workflow for creating a custom InstancedItemPlugin.
In Pragma Engine, all services and features are written in Kotlin–acting as the foundation for all of the engine’s inner workings. If you want to customize Pragma Engine’s services and tailor them for your backend needs, all you need to do is plugin a kotlin file that either overrides a preexisting pragma engine service, or make your own from scratch!
To showcase how this works, we’ll continue the process of making custom content for our three gear-type instanced items–Copper Swords, Bronze Breastplates, and Iron Helmets–by writing a custom InstancedItemPlugin, which is used to build and modify instanced item’s custom ext content.
Before we start, make sure you’ve followed every other step from the previous article, with all protobuf and JSON custom data written to the correct file paths.
Writing a Custom Plugin #
Inputting the custom plugin’s imports #
To create the custom plugin, go to 5-ext/ext/src/main/kotlin and create a Kotlin file labeled InstancedItemSeriesPlugin.kt. This folder is where you can create and organize all your custom plugins.
In the first line, copy the following code block to import all the necessary Kotlin and Pragma Engine packages. When making your own plugin, be sure you import your plugin’s required dependencies before using Pragma Engine’s content or your own.
import kotlin.random.Random
import kotlin.math.min
import pragma.content.ContentDataNodeService
import pragma.inventory.InventoryContent
import pragma.inventory.InventoryData
import pragma.inventory.InstancedItem
import pragma.inventory.InstancedItemPlugin
import pragma.inventory.InventoryServiceContent
import pragma.inventory.ext.*
import pragma.services.Service
Writing the custom plugin’s class #
After our plugin has the correct imports, create a class called InstancedItemSeriesPlugin with the following signature:
class InstancedItemSeriesPlugin(
    val service: Service,
    val contentDataNodeService: ContentDataNodeService
) : InstancedItemPlugin {}
The service value is needed for making RPC calls to any service in Pragma Engine, and the contentDataNodeService value provides access to any custom content outside of Pragma Engine’s provided content paths. Both of these values are required for the InstancedItemPlugin to run due to conformance tests.
Even though these two values will not be used in our plugin, we must define them in our class. To learn more about the ContentDataNodeService, check out our Concepts guide on Pragma Engine’s Content Data System.
Adding the plugin’s two required functions #
There are two functions that the InstancedItemPlugin uses to create and modify instanced items’ custom content: newInstanced(), which outputs an ExtInstancedItem containing individualized custom content, and update(), which modifies, adds to, or changes an already built ExtInstancedItem’s values.
For this article, our plugin is going to use newInstanced() and leave update() on its own for now. Even if you’re only using one of these functions, both of them must be implemented in order for the plugin to run.
Inside the InstancedItemPlugin’s curly brackets, add the following code to implement newInstanced() and update().
    override fun newInstanced(
        instancedSpec: InventoryContent.InstancedSpec,
        inventoryContent: InventoryServiceContent,
        startingInventory: InventoryData,
        pendingInventory: InventoryData,
        clientRequestExt: ExtPurchaseRequest?,
        serverRequestExt: ExtInstancedItemServerGrant?
    ): InstancedItemPlugin.InstancedItemPluginResult {}

    override fun update(
        initialInstancedItem: InstancedItem,
        instancedSpec: InventoryContent.InstancedSpec,
        updateEntry: InventoryContent.UpdateEntry,
        inventoryContent: InventoryServiceContent,
        startingInventory: InventoryData,
        pendingInventory: InventoryData,
        clientRequestExt: ExtInstancedItemUpdate?,
        serverRequestExt: ExtInstancedItemServerUpdate?
    ): InstancedItemPlugin.InstancedItemPluginResult {
        TODO("Not yet implemented")
    }
In the next few sections, we’ll delve deeper into how newInstanced() works, and how you can customize it to build our gear items’ custom content.
Modifying the plugin’s newInstanced() item function
#
newInstanced() interacts with and builds an instanced item’s ext data with ExtInstancedItem molds. The function does not build or grant new instanced items themselves–it only returns outputs of constructed ExtInstancedItems defined in protos.
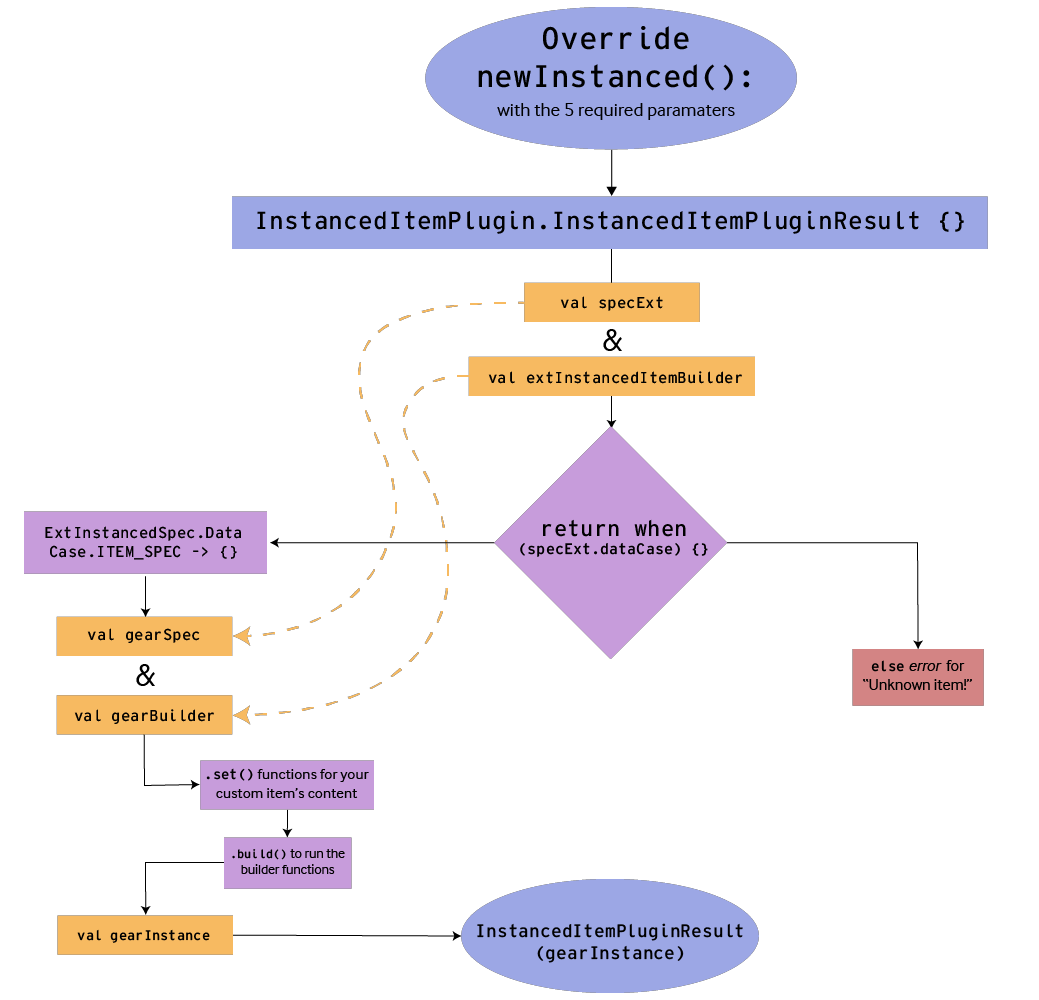
A flowchart describing the workflow of making a custom newInstanced() function in an InstancedItemPlugin.
If we want our own InstancedItemSeriesPlugin to interact with and build gear related ext data (like gearSpec definitions for items in the item catalog), we have to override and modify newInstanced() with our own logic to output Gear ext content onto new, freshly built items.
The function’s required parameters #
Time to modify the newInstanced() function with our custom content! Step by step, we’ll go through how each component of the function works and how it uses our custom content to build new instanced items.
    override fun newInstanced(
        instancedSpec: InventoryContent.InstancedSpec,
        inventoryContent: InventoryServiceContent,
        startingInventory: InventoryData,
        pendingInventory: InventoryData,
        clientRequestExt: ExtPurchaseRequest?,
        serverRequestExt: ExtInstancedItemServerGrant?
    ): InstancedItemPlugin.InstancedItemPluginResult {}
Before we write all the code to customize newInstanced(), let’s explain where each of the function’s parameters come from and what they do within the plugin.
| Parameter | Description |
|---|---|
instancedSpec | The object for spec content written in our instanced item catalog (JSON files). For this plugin, the instancedSpec parameter utilizes the ext field data in the Copper Sword, Bronze Breastplate, and Iron Helmet items (the GearSpec values of the three instanced items). |
inventoryContent | The reference object for all content in the inventory service. Use this parameter if you need to access an item spec that contains other inventory content, such as an instanced item that acts as a container for other items. |
inventoryData | The object containing all of a player’s existing inventory, like stackables and instanced items |
clientRequestExt | The object used for passing ext data from a client request, like a store purchase. |
serverRequestExt | The object used for passing ext data from a server request. |
Not all of these parameters will be used by our custom plugin, but the pre-existing newInstanced() function requires these parameters be present. Lastly, the function ends with an InstancedItemPluginResult, which is a return value that will contain all of our item building and upgrading logic.
Now, let’s customize the function to incorporate all the instanced item catalog (written in InstancedSpecs.json), Gear, and GearSpec content. Don’t worry if the code doesn’t compile yet with each step; it’ll work and compile once all code blocks have been implemented.
Implementing the function’s result #
Inside InstancedItemPluginResult’s curly brackets, add the following code that contains two important values and a return when statement.
        val extInstancedItemBuilder = ExtInstancedItem.newBuilder()
        val specExt: ExtInstancedSpec = instancedSpec.ext
        return when (specExt.dataCase) {
            ExtInstancedSpec.DataCase.GEAR_SPEC -> {}
            else -> {
                error("Unknown item!")
            }
        }
    }
The extInstancedItemBuilder uses the public, imported newBuilder() function from the inventory service to build instanced items’ ext content. Then, the specExt value acquires the Instanced Item Specs we’ve defined in the ExtInstancedSpec object in inventoryContentExt.proto. These two values are crucial for the return when statement above, which will return built ExtInstancedItems by using the new specExt value and dataCase (an enum class containing protobuf data).
For now, we’ve implemented a return when statement with an InstancedItemPluginResult() that so that our function compiles correctly. However, even though this function compiles as is, we need to put our own Gear building logic into ExtInstancedSpec.DataCase.GEAR_SPEC -> {} and the InstancedItemPluginResult so that newInstanced() can output the custom data we need.
Creating the Gear builders #
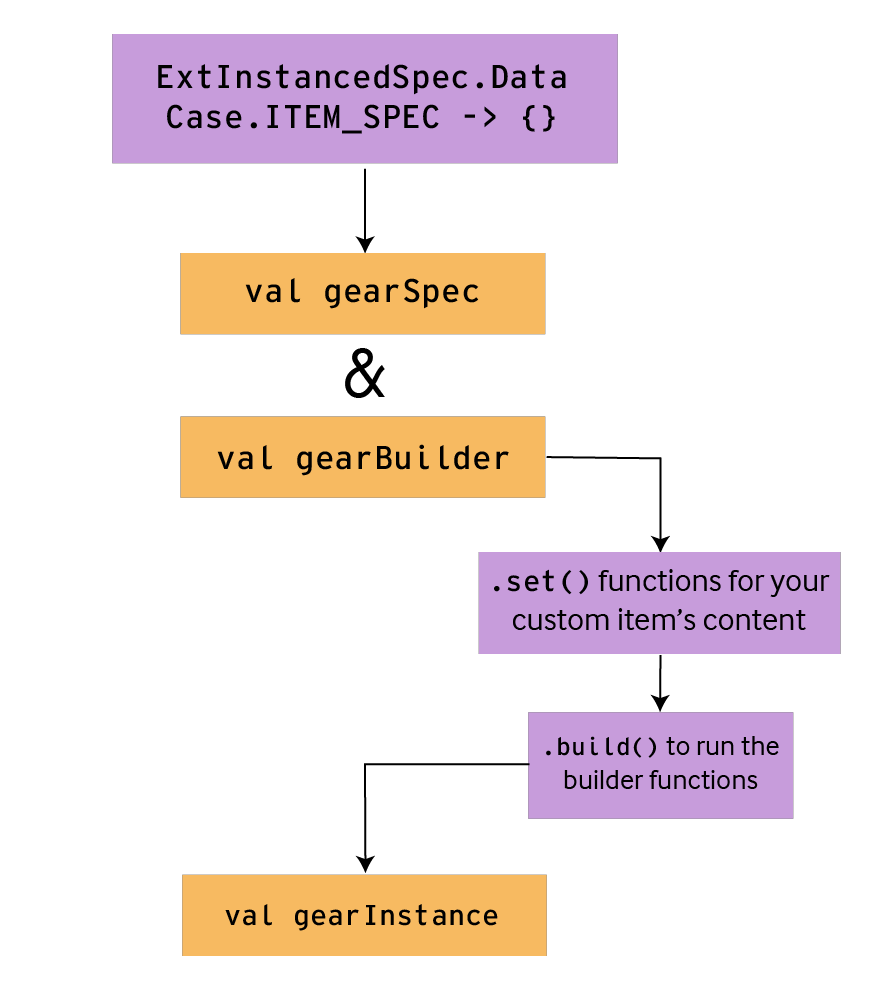
A flowchart for how to make our Gear building logic.
Inside our ExtInstancedSpec.DataCase.GEAR_SPEC -> {} brackets, create the following two values: gearSpec and gearBuilder.
                val gearSpec: GearSpec = specExt.gearSpec
                val gearBuilder = Gear.newBuilder()
The gearSpec value will grab the GearSpec protobuf data, and gearBuilder will build Gear using the Gear ExtInstancedItem mold and the public newBuilder() function. These two values will work in tandem to build items that use gearSpec in ext fields from the item catalog, like our Copper Swords, Bronze Breastplates, and Iron Helmets.
Next, we need to fill out the components of our gearBuilder!
Insert the following three components below–but not inside–the gearBuilder value.
                    .setAttributeValue(Random.nextInt(gearSpec.primaryAttributeValueMin, gearSpec.primaryAttributeValueMax))
                    .build()
The .set() functions are used to assign and build the values of ExtInstancedItems–like Gear for example. Since the only value in Gear is the primaryAttributeValue, we’ll only have one .setAttributeValue(). This particular function randomly rolls an Int value for Gear between an item’s predefined primaryAttributeValueMin and primaryAttributeValueMax in the instanced item catalog.
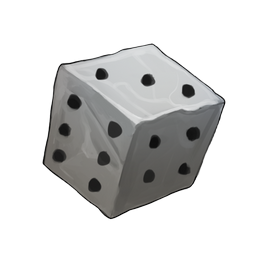
“Rolling” between min and max values for each Gear’s primaryAttributeValue
Once we’re finished defining the .set() functions, we need to end with a .build(), which uses all prior ext values to build a list for the gearBuilder.
Our newInstanced() function represents only one of many different ways you can override a newInstanced() function for your custom content. When making your own custom plugin, these .set() functions might look different depending on how you want your custom content to be built into your items.
Finishing the plugin’s result #
Underneath the gearBuilder value, implement the following code to finish the return when statement for newInstanced().
                val gearInstance = extInstancedItemBuilder.setGear(gearBuilder).build()
                InstancedItemPlugin.InstancedItemPluginResult(gearInstance)
This value uses the public setGear Builder, which was compiled by our protobufs, to build Gear related instanced items with gearBuilder.
At the end of this return when statement, the InstancedItemPlugin calls the gearInstance value to run the entire Gear item-building process; and with the process done, we’ll get each item’s custom content compiled into the Gear ExtInstancedItem mold! When we grant or purchase an item through service calls, we’ll see this output in the item’s ext field.
Making ext with the custom plugin #
Now that the InstancedItemSeriesPlugin is made, you’ll want to get your 5-ext directory created with our custom plugin in place.
make ext
There’s one final step that must be done when implementing any type of plugin: editing the local config file to register the new plugin.
Editing the config #
To add InstancedItemSeriesPlugin to our config file, go to 5-ext/config/local-dev.yml. At the bottom of the config section for game:, add the following code to create configs for plugins.
game:
  pluginConfigs:
    InventoryService.instancedItemPlugin:
      class: "InstancedItemSeriesPlugin"
Everytime you make your own plugin, whether it’s a part of game or social, the plugin must be registered in your local-dev.yml file. The pluginConfigs option allows you to grab any type of game plugin you’ve made, from whatever service, and register them here via their class.
After we’re done editing the config file, we can test our InstancedItemSeriesPlugin by running service calls to grant a player one Copper Sword, Bronze Breastplate, and Iron Helmet using Postman.
Testing Instanced Items and Custom Plugins #
Before we test our instanced items and plugin, make sure you’re running a MySQL database and have Postman installed. If you don’t already have Postman installed, check out our Postman Setup Guide.
Simulating service calls with Postman #
To get started with Postman, enter the following line in a terminal with platform as our working directory. This command gets the engine up and running so we can run calls against it.
make run
Now that Pragma Engine, MySQL, and Postman are up and running, let’s test our plugin and instanced items by running the required authentication calls and granting our three instanced items to a player. Granting these items will cause our InstancedItemSeriesPlugin to run for each item, building out each item’s ext fields with our unique InstancedItemPluginResult.
Authenticating Operator and Player logins #
In the PragmaDev folder, navigate to the two service calls: Public ➨ Operator - AuthenticateOrCreateV2 and Public ➨ Player - AuthenticateOrCreateV2. Then click Send for both service calls and check that the response body for each call has given us pragmaTokens with a filled pragmaGameToken and pragmaSocialToken.
Next, we’re going to grant a player one Copper Sword, Bronze Breastplate, and Iron Helmet.
Granting instanced items to a player #
Locate the service call: Game ➨ RPC - Operator ➨ Inventory ➨ GrantItemsOperatorV1 and open the service call’s body.
In the payload’s itemGrants’s square brackets, add three separate instanced grants. Each grant can have an empty ext and tags field, but the catalogId for the grants should be metal_sword_1 for the Copper Sword, metal_chest_2 for the Bronze Breastplate, and metal_hat_3 for the Iron Helmet. You can leave the empty stackable grant or remove it; it won’t conflict with the call if the catalogId is empty.
Click Send once you’ve added the three separate grants.
{
    "requestId": 1,
    "type": "InventoryRpc.GrantItemsOperatorV1Request",
    "payload": {
        "playerId": "{{test01PlayerId}}",
        "itemGrants": [
            {
                "instanced": {
                    "ext": {},
                    "catalogId": "metal_sword_1",
                    "tags" : []
                }
            },
            {
                "instanced": {
                    "ext": {},
                    "catalogId": "metal_chest_2",
                    "tags" : []
                }
            },
            {
                "instanced": {
                    "ext": {},
                    "catalogId": "metal_hat_3",
                    "tags" : []
                }
            },
            {
                 "stackable": {
                    "catalogId": "",
                    "amount": 1,
                    "tags": []
                }
            }
        ]
    }
}
Once you’ve called the GrantItemsOperatorV1 with our three instanced items, let’s check the player’s inventory to see if our items were properly granted and if the InstancedItemSeriesPlugin was fired up to generate each item’s ext fields.
Checking an inventory for instanced items #
Go to Game ➨ RPC - Operator ➨ Inventory ➨ GetInventoryOperatorV1 and click Send to check the player’s inventory.
There should bould one metal_sword_1, metal_chest_2, and metal_hat_3 in the player’s inventory. Most important is whether the instanced item’s ext fields were properly built. Below is an example of what a built metal_sword_1 could look like when you run GetInventoryOperatorV1.
        "payload": {
            "full": {
                "stackables": [],
                "instanced": [
                    {
                        "catalogId": "metal_sword_1",
                        "instanceId": "4c30b55d-28d3-4bde-b424-26abc5cf5020",
                        "ext": {
                            "gear": {
                                "attributeValue": 7.0
                            }
                        }
                    }
                ],
                "version": "1"
            }
In each item’s ext field, if there’s a gear containing each item’s correct primaryAttribute value (damage_physical for swords and resistance_physical for armor) and an attributeValue stat between the item’s gearSpec min and max attribute values in the item catalog (InstancedSpecs.json), then huzzah! You’ve just made three unique instanced items and written a custom Kotlin plugin with Pragma Engine! This is one of many ways you can plug in your custom content to Pragma Engine’s services.

The three built instanced items.
In the next article, we’ll learn how to alter the custom InstancedItemPlugin workflow, how to write the update() function for instanced items, and much more!
Appendix #
For more information, check out the rest of the articles in this series:
Part I: Creating Custom Content for Instanced Items
Part II: Building Unique Instanced Items with Plugins (this article)
Part III: Upgrading Instanced Items