Setting up the Unreal project #
In this section, we’ll build the prerequisite functionality for our Unreal project, such as getting our player controller stubbed out and making it possible to log into the platform.
Get started #
To help you visualize what you’ll build, below is a screenshot of a barebones party screen.
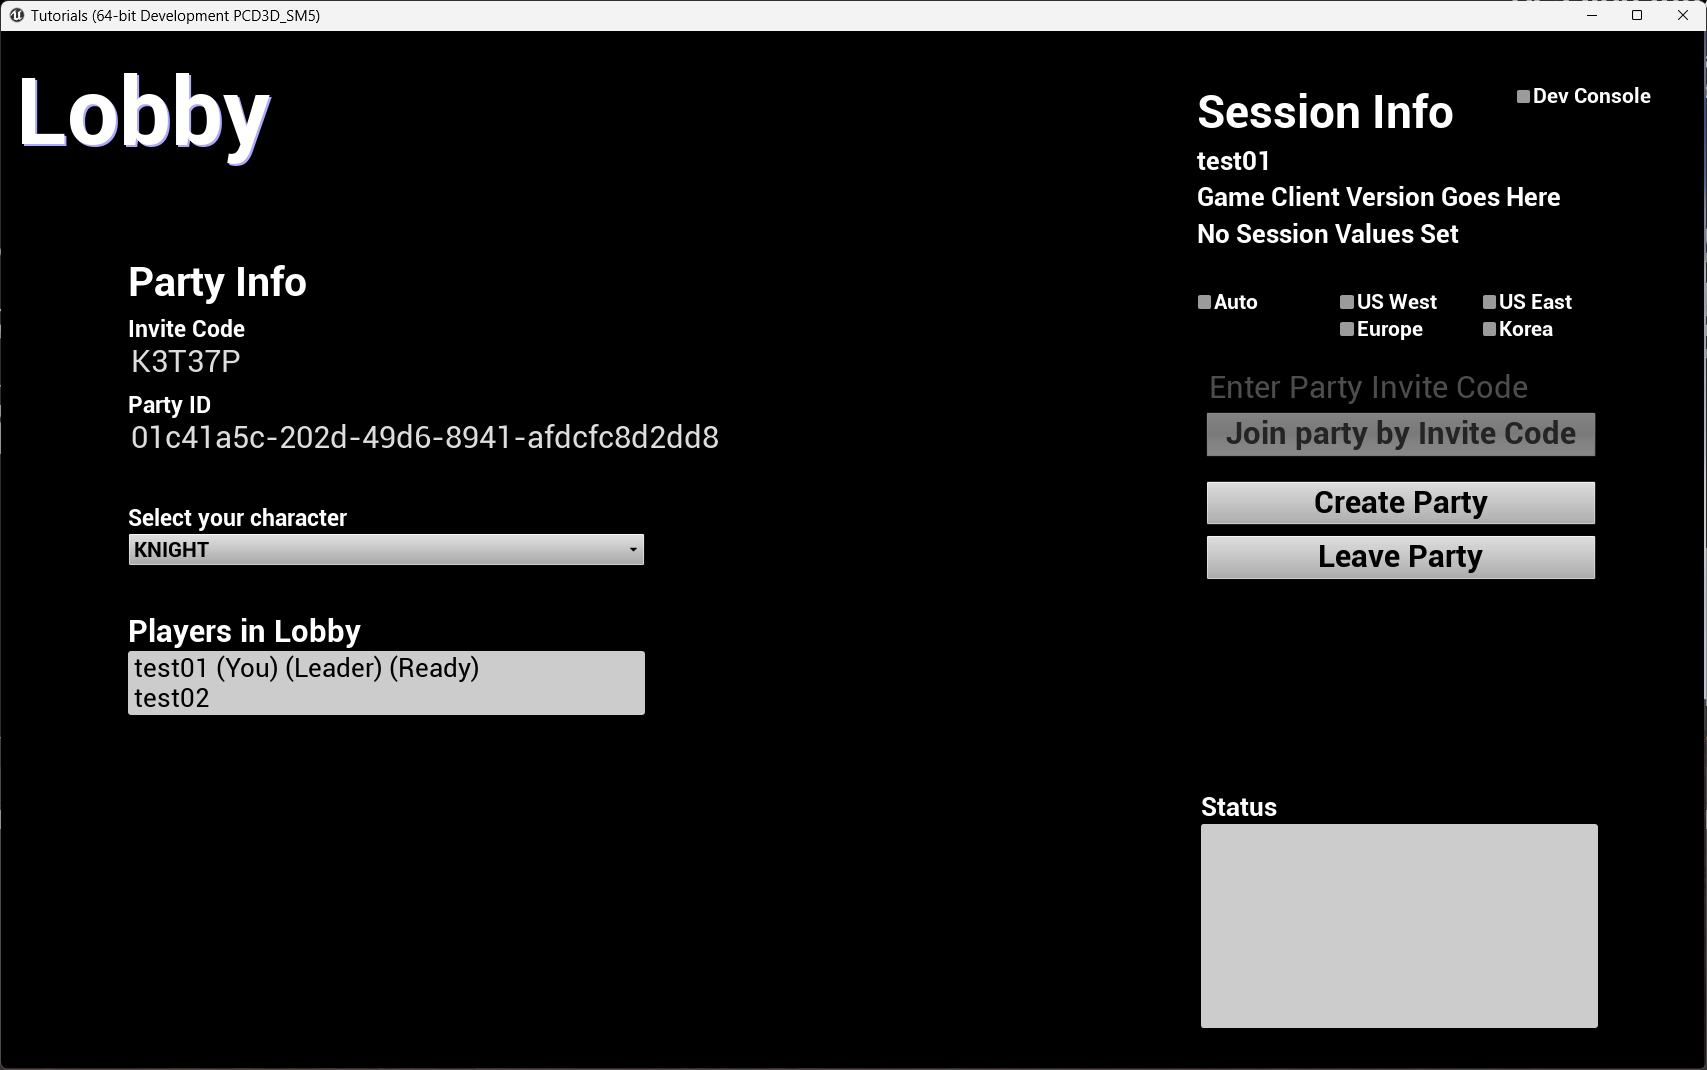
This example is simplified to give you an introduction to the game flow. An actual game would have a more sophisticated design, and the player experience may differ significantly.
If you already have an Unreal project set up and integrated with the Pragma SDK, run the update-pragma-sdk.sh script to make the protos we just defined available to your Unreal game.
The following directions propose one possible way to organize and name your code. Adapt the organization and naming to suit your project’s needs.
Create your C++ and Blueprint classes #
Open your Unreal project. In the Unreal Editor Content Browser under C++ Classes, create a new C++ player controller and name it PC_TutorialPlayerController. After the player controller is created, right-click on it in the Content Browser and create a Blueprint class based on it. We recommend creating this Blueprint class in a new directory dedicated to Blueprints.
Next, create another Blueprint class. Choose Game Mode Base as the parent, and name this class GM_TutorialGameModeBase. After it’s created, double-click it to bring up the Class Defaults view. Under Player Controller Class, select PC_TutorialPlayerController.
Add function definitions #
Open your PC_TutorialPlayerController.h header file and edit the includes so that they match the following:
#include "CoreMinimal.h"
#include "PragmaResult.h"
#include "PragmaRuntime.h"
#include "PragmaPlayer.h"
#include "PragmaGameInstanceSubsystem.h"
#include "GameFramework/PlayerController.h"
#include "TutorialPlayerController.generated.h"
Insert the following below GENERATED_BODY():
public:


protected:


private:
	Pragma::FRuntimePtr Runtime;
	Pragma::FPlayerPtr Player;
We will be adding to the header file as we build out the party functionality over the course of this guide.
Define prerequisite functions #
We’ll now define and hook up the necessary function definitions to successfully create a party. Create a Blueprint where you can build your UI. As you follow this guide, create the necessary UI elements so you can view and manipulate the state of the party.
Unreal Boilerplate Functions #
Create the following function declaration in your header file:
public:
    virtual void BeginPlay() override;
Fill in the following function definitions:
void APC_TutorialPlayerController::BeginPlay()
{
	Super::BeginPlay();
	UE_LOG(LogTemp, Display, TEXT("Initializing") );
	Init();
}
This is your standard Unreal Engine boilerplate.
Next, let’s create the Init() function. Insert the following into your header under public.
void Init();
In your source file, add the following:
void APC_TutorialPlayerController::Init()
{
	auto* World = GetWorld();
	if (!World->IsClient())
	{
		return;
	}

	Runtime = GetGameInstance()->GetSubsystem<UPragmaGameInstanceSubsystem>()->Runtime();
	Player = Runtime->GetOrCreatePlayer();

	if (!ensure(Player))
	{
		return;
	}

	Player->OnConnected.AddUObject(
		this, &ATutorialPlayerController::HandleConnected);
	Player->OnDisconnected.AddUObject(
		this, &ATutorialPlayerController::HandleDisconnected);
}
This initializes the Pragma session and registers event handlers for two specific events: OnConnected and OnDisconnected. When these events occur, the corresponding C++ function is called, which allows us to respond to these events with code.
Connection and Disconnection Handlers #
Let’s create our HandleConnected() and HandleDisconnected() functions. In the header, add the following:
public:
    UFUNCTION(BlueprintImplementableEvent, Category = "Widget")
    void OnPragmaConnected(const UPragmaParty* PragmaParty);

private:
    void HandleConnected();
    void HandleDisconnected();
Then add the following to your source file:
void APC_TutorialPlayerController::HandleConnected()
{
	UE_LOG(LogTemp, Display, TEXT("Pragma Connected") );
	OnPragmaConnected(Player->GameLoopApi().GetParty());
}
Upon successfully connecting to Pragma, we call OnPragmaConnected(). Remember that OnPragmaConnected() is a BlueprintImplementableEvent, so you can handle all appropriate UI logic in your PC_TutorialPlayerController Blueprint class such as transitioning from the login screen to the main menu or displaying the user’s name.
For the purposes of this example, you can use the OnPragmaConnected event in Blueprint as the trigger to switch to the lobby UI.
void ATutorialPlayerController::HandleDisconnected()
{
	UE_LOG(LogTemp, Display, TEXT("HandleDisconnected(): Pragma Disconnected."));
}
This is where we handle disconnection events. In this example, we’re only logging to the console. In a production game, you can add logic as appropriate here, such as transitioning the game client back to the login screen or showing an error message when the disconnection was due to an error.
Login #
We’ll want the ability to enter arbitrary usernames so that we can log in with different accounts, because parties consist of multiple players.
In your header, add the following under protected:
UFUNCTION(BlueprintCallable, Category="Pragma")
void LogIn(const FString& Username);
Then provide the function definition in your source file:
void ATutorialPlayerController::LogIn(const FString& Username)
{
	Player->LogIn(
		EPragma_Account_IdProvider::UNSAFE,
		Username,
		Pragma::FPlayer::FLoggedInDelegate::CreateLambda(
			[this](const TPragmaResult<>& Result) { HandleLoggedIn(Result); }));
}
Build the UI to actually log in. At a minimum, you’ll need a text box to take in a username. The LogIn function can be invoked by a separate button or by pressing the enter key.
As a reminder, if you build the login screen as a separate view from the main menu or party screen, you can use the OnPragmaConnected event to transition away from the login view.
%22/%3E%3Cpath%20d=%22M82%20113.698c1.821%201.063%201.834%202.78.0%203.843l-13.084%207.687a7.17%207.17.0%2001-3.284.798%207.17%207.17.0%2001-3.284-.798l-13.16-7.687c-1.821-1.063-1.834-2.78.0-3.843l13.084-7.687a7.168%207.168.0%20016.568.0L82%20113.698z%22%20fill=%22url(%23b)%22/%3E%3Cpath%20d=%22M73.16%20114.658a.985.985.0%2001.487.368%201.037%201.037.0%20010%201.186.981.981.0%2001-.486.369l-6.383%203.846a3.438%203.438.0%2001-3.198.0l-6.42-3.846a.982.982.0%2001-.486-.369%201.035%201.035.0%20010-1.186.986.986.0%2001.486-.368l6.383-3.846a3.438%203.438.0%20013.198.0l6.42%203.846z%22%20fill=%22%23fff%22/%3E%3Cpath%20d=%22M111%2048c-1.455-.642-37.943-12.532-45.55-14.5-7.607%202.022-43.495%2016.358-44.95%2017l37.504%2065.718c.106.239.291.435.524.556l5.542%203.209a3.038%203.038.0%20002.76.0l5.51-3.209c.25-.123.441-.338.535-.599L111%2048z%22%20fill=%22url(%23c)%22/%3E%3Cpath%20fill-rule=%22evenodd%22%20clip-rule=%22evenodd%22%20d=%22M109.533%2040.686c-6.925%203.665-17.69%203.562-24.4-.311-6.892-3.98-6.892-10.431.0-14.41%201.422-.822%203.026-1.473%204.737-1.955-17.595-6.637-41.42-5.496-56.87%203.424-17.72%2010.23-17.72%2026.815.0%2037.044%2017.719%2010.23%2046.447%2010.23%2064.167.0%2011.194-6.462%2015.316-15.461%2012.366-23.792z%22%20fill=%22url(%23d)%22/%3E%3Cg%20opacity=%22.7%22%20filter=%22url(%23e)%22%3E%3Ccircle%20r=%2237.046%22%20transform=%22scale(1.22477%20.70706)%20rotate(45%20-55.303%2098.057)%22%20fill=%22url(%23f)%22/%3E%3C/g%3E%3Cpath%20fill-rule=%22evenodd%22%20clip-rule=%22evenodd%22%20d=%22M96.321%2027.615a8.615%208.615.0%2001-2.019-.824c-2.848-1.644-2.848-4.31.0-5.954%201.296-.748%202.958-1.156%204.653-1.223a41.764%2041.764.0%2000-1.788-1.092c-17.72-10.23-46.448-10.23-64.168.0-17.72%2010.23-17.72%2026.814.0%2037.044s46.448%2010.23%2064.168.0c8.025-4.633%2012.416-10.57%2013.172-16.63-4.598%201.417-10.442%201.007-14.318-1.23-4.746-2.74-4.746-7.183.0-9.923.099-.057.199-.113.3-.168zm9.666-1.923a2.064%202.064.0%2001-.068.076l.139.01c-.023-.03-.047-.058-.071-.086z%22%20fill=%22url(%23g)%22/%3E%3Ccircle%20r=%222%22%20transform=%22matrix(.86604%20.49997%20-.86604%20.49997%2062.464%2051)%22%20fill=%22%23121212%22/%3E%3Ccircle%20r=%222%22%20transform=%22matrix(.86604%20.49997%20-.86604%20.49997%2081.464%2045)%22%20fill=%22%23121212%22/%3E%3Ccircle%20r=%222%22%20transform=%22matrix(.86604%20.49997%20-.86604%20.49997%2043.642%2031)%22%20fill=%22%23121212%22/%3E%3Ccircle%20r=%222%22%20transform=%22matrix(.86604%20.49997%20-.86604%20.49997%2039.464%2045)%22%20fill=%22%23121212%22/%3E%3Ccircle%20r=%222%22%20transform=%22scale(1.22477%20.70706)%20rotate(45%20-12.95%2084.623)%22%20fill=%22%23121212%22/%3E%3Ccircle%20r=%222%22%20transform=%22matrix(.86604%20.49997%20-.86604%20.49997%2062.464%2035)%22%20fill=%22%23121212%22/%3E%3Cdefs%3E%3ClinearGradient%20id=%22a%22%20x1=%2265.415%22%20y1=%22133.384%22%20x2=%2262.707%22%20y2=%22116.141%22%20gradientUnits=%22userSpaceOnUse%22%3E%3Cstop%20stop-color=%22%23bebebe%22/%3E%3Cstop%20offset=%221%22%20stop-color=%22%23fff%22/%3E%3C/linearGradient%3E%3ClinearGradient%20id=%22b%22%20x1=%2265.415%22%20y1=%22126.531%22%20x2=%2257.672%22%20y2=%22104.287%22%20gradientUnits=%22userSpaceOnUse%22%3E%3Cstop%20stop-color=%22%23bebebe%22/%3E%3Cstop%20offset=%221%22%20stop-color=%22%23fff%22/%3E%3C/linearGradient%3E%3ClinearGradient%20id=%22c%22%20x1=%2265.409%22%20y1=%22107.427%22%20x2=%2265.409%22%20y2=%2274.173%22%20gradientUnits=%22userSpaceOnUse%22%3E%3Cstop%20stop-color=%22%23fff%22%20stop-opacity=%22.72%22/%3E%3Cstop%20offset=%221%22%20stop-color=%22%23fff%22%20stop-opacity=%220%22/%3E%3C/linearGradient%3E%3ClinearGradient%20id=%22d%22%20x1=%2265.007%22%20y1=%2270.496%22%20x2=%2261.493%22%20y2=%22.477%22%20gradientUnits=%22userSpaceOnUse%22%3E%3Cstop%20stop-color=%22%23edf2f9%22/%3E%3Cstop%20offset=%221%22%20stop-color=%22%23fff%22%20stop-opacity=%220%22/%3E%3C/linearGradient%3E%3ClinearGradient%20id=%22f%22%20x1=%2270.425%22%20y1=%2221.274%22%20x2=%22-.284%22%20y2=%2248.41%22%20gradientUnits=%22userSpaceOnUse%22%3E%3Cstop%20stop-color=%22%231efff1%22/%3E%3Cstop%20offset=%221%22%20stop-color=%22%231548ff%22/%3E%3C/linearGradient%3E%3ClinearGradient%20id=%22g%22%20x1=%2220.05%22%20y1=%2263.78%22%20x2=%2255.07%22%20y2=%22-9.969%22%20gradientUnits=%22userSpaceOnUse%22%3E%3Cstop%20offset=%22.156%22%20stop-color=%22%231efff1%22/%3E%3Cstop%20offset=%221%22%20stop-color=%22%231548ff%22/%3E%3C/linearGradient%3E%3Cfilter%20id=%22e%22%20x=%224.71%22%20y=%226.763%22%20width=%22120.747%22%20height=%2282.388%22%20filterUnits=%22userSpaceOnUse%22%20color-interpolation-filters=%22sRGB%22%3E%3CfeFlood%20flood-opacity=%220%22%20result=%22BackgroundImageFix%22/%3E%3CfeBlend%20in=%22SourceGraphic%22%20in2=%22BackgroundImageFix%22%20result=%22shape%22/%3E%3CfeGaussianBlur%20stdDeviation=%227.5%22%20result=%22effect1_foregroundBlur%22/%3E%3C/filter%3E%3C/defs%3E%3C/svg%3E)