Adding content #
File Architecture #
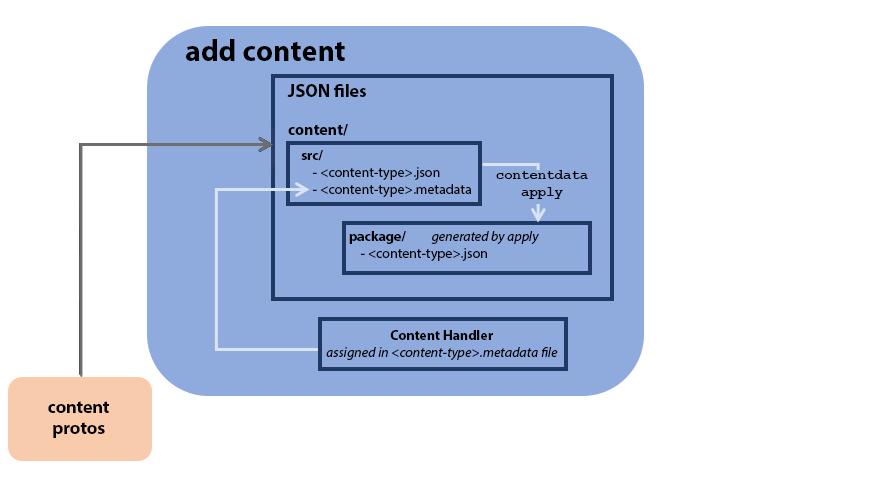
Two types of files make up the basics of adding and updating content in the Content Data system: protobuf files that define blueprints for content, and JSON files that populate these blueprints with specific content.
Content Protos #
Content protos are the source of truth for content definitions. They provide a blueprint for possible fields and attributes for each type of content.
JSON Files #
These files populate the actual instances of protos with user-defined data. They must perfectly match proto definitions.
Adding content with protos and JSON files.
Steps for Making New Content #
The content addition process follows several steps, which we’ll cover in this section:
- Create the protos, which serve as blueprints for the JSON files
- Add content with the JSON files
- Run the apply command to verify and generate a JSON package that services can read
- (optional) Define Content Handlers for live data migrations
Create the protos #
Edit or create any relevant protos in the 5-ext/ext-protos folder. If you’re editing provided content files, this is where you put the customizable ext fields.
Be sure to only edit files in5-ext! If you edit files in the1-protosfolder, it won’t work.
Create the JSON files #
Create and populate the two required JSON src/ files with the desired content. You can use the init command (in bash) to generate these files, or you can create them manually.
The two required files:
- a
<content-type>.jsonfile that contains the list of content objects using the blueprints from the protos and defining specific fields. - a
<content-type>.metadatafile that contains metadata information, such as a link to the Content Handler and a version incrementer.
Remember that JSON objects can represent nested messages, so make sure that they have all fields filled out, not just ext fields.Apply changes and validate #
Run the apply command (in bash or RPC for dev-only) to verify data and generate a JSON package/ file that services can now read.
Do not make the package/ file yourself, as this would skip the validation step. We also recommend never editing package files manually.Basic Validation #
It’s easy to have typos or missing data, especially when working with nested protos. If you update your source of truth directly, you can potentially crash your game.
The apply command makes sure that when new content is applied, it’s been validated. It checks that the JSON matches the proto schema directly. Invalid content will prevent changes from being applied, and will offer specific error details to give users the chance to fix content immediately.
In addition to the validation of proto schemas, you can write custom validation for protos, for example, if you’d like to verify that a specific field is never empty.
Cross-Content Validation #
Cross-content validation is also available.
For provided content, Pragma Engine validates content across nested IDs (outside of ext) during the contentdata apply command. Validation of custom content (across nested exts) can be added to a Content Handler under the validateExtWithAllContent function.
To validate acrossextfields in provided content, a new Content Handler must be written. The new Content Handler needs to inherit from the provided Content Handler to maintain non-extcontent validation.
The validateExtWithAllContent function must contain these steps:
- Pull out relevant
contentDatafrom thecontentByTypemap. The keys are strings of content types, so use the content type’s file name without the JSON extension.InventoryCrossContentValidatorcan be used to make this step easier when validating across provided Inventory content.
- Pull out nested content IDs from the exts.
- These must be stored in a
mutableSetOf<CorrespondingIds>().CorrespondingIdsis a class that holds theidToValidateand theparentId. This ensures error messages are clear to assist with debugging.
- These must be stored in a
- Check that nested IDs are valid.
- Confirm that IDs are all part of the relevant content data type using
ContentData.validateIds(idsToValidate: Set<CorrespondingIds>, contentType: String).
- Confirm that IDs are all part of the relevant content data type using
Define Content Handlers #
Content Handlers are a type of plugin assigned within the metadata file which handle database migrations for live data.
Content Handlers only matter when doing live data migrations. Games that are in development where database data doesn’t need to be preserved and therefore can be wiped don’t require data migrations and therefore don’t need to worry about Content Handlers. For more information, check out Data Migrations for Live Games.
ContentHandler is the class responsible for validating, containing, and providing access to content protos.
- Provided Inventory service content comes with default Content Handlers.
- Custom content must have an associated custom-defined Content Handler.
In most cases, the default Content Handlers should be sufficient. In more complex cases, custom-defined Content Handlers can be created and populated in the relevant service directory within 5-ext/ext/src/main/kotlin.
Defining a custom Content Handler for provided content is possible to enable certain features, such as cross-content validation across ext fields, which is covered below in Cross-Content Validation.Create a custom Content Handler #
At minimum, Content Handlers must contain the class along with the following information:
the handler’s name and the fact that it’s a
ContentHandler, along with the custom proto’s location, name, and its class:class [handler name]: ContentHandler<[package].[proto name]>( [package].[proto name]::class )the
idFromProtooverride that returns the proto IDoverride fun idFromProto(proto: [package].[proto name]): String { return proto.[id field] }
Once the Content Handler has been created, you must assign it in the metadata file nested under applyTriggers:
"contentHandler": "[Content Handler class name]"
