Authentication with Steam #
In this section, we’ll log into the platform with Steam. This method is appropriate for use in production.
Prerequisites:
- A Steam account associated with a Steamworks organization
- Set Up the Unreal SDK
Acquire the Steam Application ID and Steamworks Web API key #
This guide assumes that you have already created and published your game on Steam. Consult Valve’s official Steam documentation for further assistance.
- Log into Steamworks.
- Hover over Users & Permissions, then click Manage Groups.
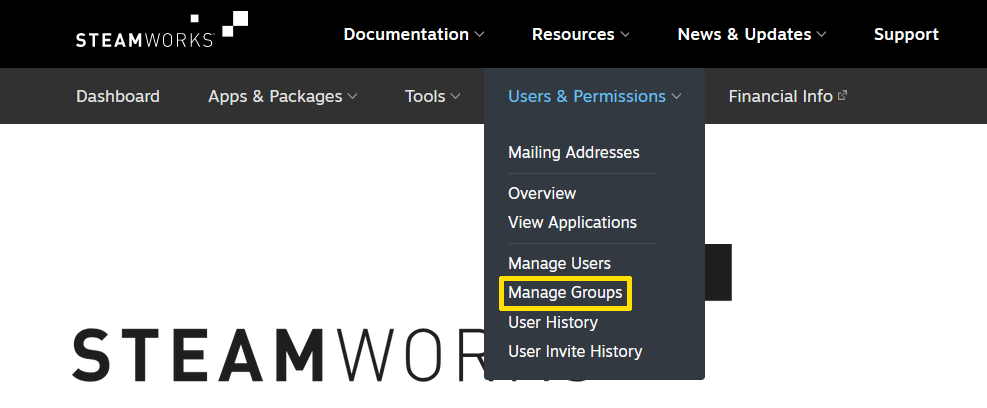
- Select a group or create a new group.
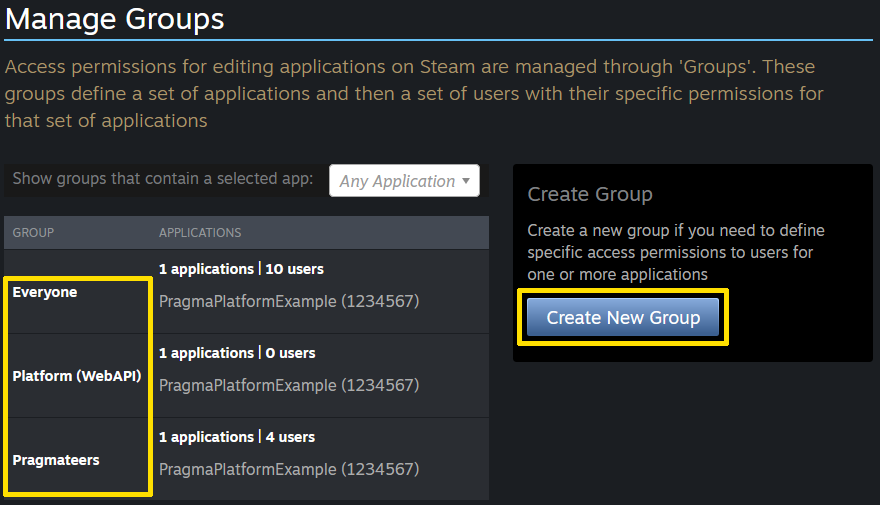
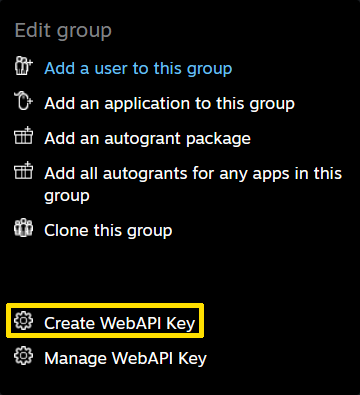
- Create or view your Steamworks Web API Key.
If a key doesn’t yet exist, you must create one by clicking Create WebAPI Key. It will then appear.
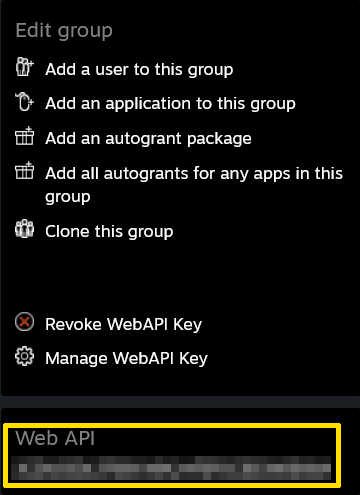
If you selected an existing group which already has a Web API key, you’ll see it listed under the Web API box on the right-hand side.
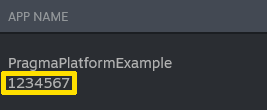
- Take note of your game’s Steam Application ID. Hover over Users & Permissions, then click View Applications. The number that appears in the App Name column beneath the game name is the Steam Application ID.
Configure the Pragma Engine Steam Identity Provider #
Navigate to the
pragma-engine/platform/PROJECT/config/directory and openlocal-dev.yml.Insert the following code while making sure to edit in your Application ID and Web API Key:
Be sure to nest the configuration under AccountService.identityProviderPlugins if you already have other identity providers configured.social:
shared:
configs:
Steam: # credentials are configured here to be used by any service or plugin that needs to make calls to this provider
class: "pragma.shared.SteamCredentialsConfig"
config:
appId: "${steamAppId}"
steamWebAPIKey: "${steamWebApiKey}"
pluginConfigs:
AccountService.identityProviderPlugins:
plugins:
Steam:
class: "pragma.account.SteamIdentityProviderPlugin"
config:
sharedConfigKey: "Steam" # must match key under shared - can be customized
restrictByAppOwnership: false
restrictByAccountBan: false
playerLoginEnabled: true
operatorLoginEnabled: false
accountLinkingEnabled: true
accountUnlinkingEnabled: false
accountLinkingCooldownInDays: 0
accountLinkingOneAssociationOnly: false
showPortalLoginButton: false
visibleToOtherPlayers: true
steamWebAPIKey does not need to be encrypted when running Pragma Engine locally.- Run Pragma Engine via one of the following methods.
Once the engine has started successfully, it prints the message INFO main - Pragma server startup complete.
Enable Unreal’s Steam plugin #
You will need to replaceyour_app_idwith your app’s Steam App ID, andyour_service_identitywith an identifier of your choosing for the service that validates the ticket (see the note below).
- Open
DefaultEngine.inilocated in theUnreal Projects/[Project name]/Configdirectory and add the following configs:
[/Script/Engine.GameEngine]
+NetDriverDefinitions=(DefName="GameNetDriver",DriverClassName="OnlineSubsystemSteam.SteamNetDriver",DriverClassNameFallback="OnlineSubsystemUtils.IpNetDriver")

[OnlineSubsystem]
DefaultPlatformService=Steam

[OnlineSubsystemSteam]
bEnabled=true
SteamDevAppId=your_app_id
DefaultRemoteServiceIdentity=your_service_identity

[/Script/OnlineSubsystemSteam.SteamNetDriver]
NetConnectionClassName="OnlineSubsystemSteam.SteamNetConnection"

[PacketHandlerComponents]
+Components=OnlineSubsystemSteam.SteamAuthComponentModuleInterface
DefaultRemoteServiceIdentityis required when acquiring a ticket with the"WebAPI"token type (used byGetLinkedAccountAuthTokenin the login code below). Unreal’s Steam Online Subsystem reads this value and passes it to Steam’sGetAuthTicketForWebApi, which bakes it into the ticket as the identity of the service that will validate it; if it is left unset, ticket acquisition fails withLogOnlineIdentity: Warning: STEAM: FOnlineIdentitySteam::GetLinkedAccountAuthToken DefaultRemoteServiceIdentity not set. The value is an arbitrary string you choose (for example, your game or backend name) - Pragma Engine validates the ticket without requiring a matching identity, so any non-empty value works.Alternatively, you can skip this config setting and supply the identity inline in the token type, appended after a colon - for example
GetLinkedAccountAuthToken(0, TEXT("WebAPI:your_service_identity"), ...). When the token type contains a colon, the part after it is used as the identity andDefaultRemoteServiceIdentityis ignored; the config value is only consulted when the token type has no inline identity (plain"WebAPI"). Use whichever you prefer - the config keeps the identity out of code, while the inline form keeps it next to the call site.
- Open
[Project Name].Build.cslocated in theUnreal Projects/[Project name]/Source/[Project name]directory and add"OnlineSubsystem", "OnlineSubsystemSteam", "Steamworks"toPublicDependencyModuleNames.AddRange. Confirm that yourPublicDependencyModuleNames.AddRangefollows this structure:
PublicDependencyModuleNames.AddRange(
    new string[] {
        "Core",
        "CoreUObject",
        "Engine",
        "InputCore",
        "PragmaSDK",
        "PragmaSDKAux",
        "OnlineSubsystem",
        "OnlineSubsystemSteam",
        "Steamworks"
    }
);
- Open your project in Unreal Editor.
- Click on the Edit menu, then Plugins to open the Plugins window.
- Ensure that both the Online Subsystem and Online Subsystem Steam plugins are enabled, then restart Unreal Editor.
Integrate Steam login into your game #
We will use the MyPlayerController class we created in Log in from a Game Client to add a Steam login method.
Acquire the Steam ticket with the asynchronousGetLinkedAccountAuthTokenmethod (using the"WebAPI"token type) rather than the synchronousGetAuthToken. The synchronous method returns a ticket immediately - before Steam has finished propagating it to its authentication servers - which can cause the first login attempt to fail with a transient validation error. The asynchronous method waits for Steam’s confirmation callback before handing back the ticket, so the ticket is safe to use as soon as you receive it.
- In
MyPlayerController.h, declare the following method under thepublicaccess modifier:
UFUNCTION(Exec)
void LogInSteam();
- In
MyPlayerController.cpp, add the following include statements:
#include "OnlineSubsystem.h"
#include "Interfaces/OnlineIdentityInterface.h"
- In
MyPlayerController.cpp, define theLogInSteam()method.Player->LogIntakes aFGetProviderTokenDelegateinstead of a raw token: a token fetched too early can expire while the player waits in the login queue, so the delegate defers the actual Steam ticket request until the SDK is ready to use it, once the player has cleared the queue. The delegate must callOnResultexactly once: with the token on success, or with a failure if the ticket can’t be obtained, which ends the login immediately with that error:
void AMyPlayerController::LogInSteam()
{
  const Pragma::FPlayer::FGetProviderTokenDelegate GetProviderToken =
    Pragma::FPlayer::FGetProviderTokenDelegate::CreateWeakLambda(
      this, [this](Pragma::FPlayer::FProviderTokenReadyDelegate OnResult)
      {
        IOnlineSubsystem* OSS = IOnlineSubsystem::Get(TEXT("STEAM"));
        if (OSS == nullptr)
        {
          OnResult.ExecuteIfBound(Pragma::FPragmaProviderTokenResult::Failure(TEXT("Steam Online Subsystem is unavailable.")));
          return;
        }

        OSS->GetIdentityInterface()->GetLinkedAccountAuthToken(0, TEXT("WebAPI"),
          IOnlineIdentity::FOnGetLinkedAccountAuthTokenCompleteDelegate::CreateWeakLambda(
            this, [OnResult](int32 LocalUserNum, bool bWasSuccessful, const FExternalAuthToken& AuthToken)
            {
              if (!bWasSuccessful || !AuthToken.HasTokenString())
              {
                OnResult.ExecuteIfBound(Pragma::FPragmaProviderTokenResult::Failure(TEXT("Failed to acquire a Steam auth ticket.")));
                return;
              }

              OnResult.ExecuteIfBound(Pragma::FPragmaProviderTokenResult::Success(AuthToken.TokenString));
            }));
      });

  Player->LogIn(
    EPragma_Account_IdProvider::STEAM,
    GetProviderToken,
    Pragma::FPlayer::FLoggedInDelegate::CreateWeakLambda(
      this, [this](const TPragmaResult<>& Result)
      {
        if (Result.IsSuccessful())
        {
          UE_LOG(LogTemp, Display, TEXT("Pragma -- Logged in with Steam."));
        }
        else
        {
          UE_LOG(LogTemp, Error, TEXT("Pragma -- Steam login failed: %s"),
            *Result.GetErrorAsString());
        }
      }));
}
- Compile the project in your IDE.
Build a standalone binary #
The Steam Online Subsystem in Unreal Engine does not work in PIE (Play In Editor) mode. It will still work if you run using the “Standalone Game” option.
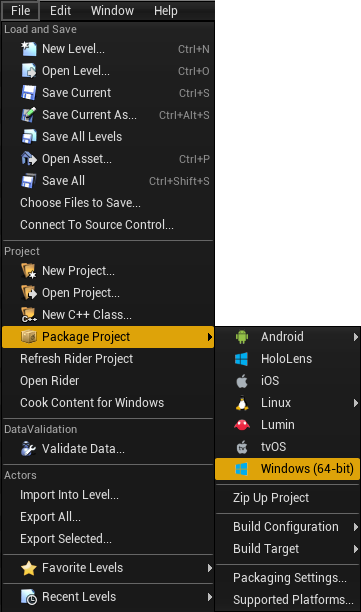
In the Edit menu under Project Settings…, ensure that your project’s Default GameMode is set to MyGameModeBase before packaging a standalone version of your project.- Build a standalone version of your game by going to the File menu, Package Project, then building a Windows (64-bit) version of the game.
Ensure Pragma is running. Confirm that your Steam client is open and logged in with the same account used to get the Steam App ID.
Navigate to the location of the built project. You should find
[Your project name].exeinside theWindowsNoEditordirectory.Create a shortcut to
[Your project name].exe, then right-click the shortcut left-click Properties.In the Shortcut Properties window, add a space and
-logto the end of the Target field. The Target field should readpath to your executable\[Your project name].exe -log. You will now see a separate log window appear when launching your standalone game via this shortcut.Open your standalone game using the shortcut you just created.
Run the game, open the in-game console with
~, and typeLogInSteam.If successful, you should see the app you registered with Steam running inside the Steam client. A separate log window should open and you should see a successful login attempt via Steam.
For extra confirmation, you can use the Pragma Portal to verify a successful Steam login.
Navigate to http://localhost:11200/ to load Pragma Portal. Select Sign in with Pragma Unsafe and type in test04.
Confirm you see a player with your Steam display name listed in the Accounts section of the portal. Clicking on this player should show that the identity provider for this player is Steam.
%22/%3E%3Cpath%20d=%22M82%20113.698c1.821%201.063%201.834%202.78.0%203.843l-13.084%207.687a7.17%207.17.0%2001-3.284.798%207.17%207.17.0%2001-3.284-.798l-13.16-7.687c-1.821-1.063-1.834-2.78.0-3.843l13.084-7.687a7.168%207.168.0%20016.568.0L82%20113.698z%22%20fill=%22url(%23b)%22/%3E%3Cpath%20d=%22M73.16%20114.658a.985.985.0%2001.487.368%201.037%201.037.0%20010%201.186.981.981.0%2001-.486.369l-6.383%203.846a3.438%203.438.0%2001-3.198.0l-6.42-3.846a.982.982.0%2001-.486-.369%201.035%201.035.0%20010-1.186.986.986.0%2001.486-.368l6.383-3.846a3.438%203.438.0%20013.198.0l6.42%203.846z%22%20fill=%22%23fff%22/%3E%3Cpath%20d=%22M111%2048c-1.455-.642-37.943-12.532-45.55-14.5-7.607%202.022-43.495%2016.358-44.95%2017l37.504%2065.718c.106.239.291.435.524.556l5.542%203.209a3.038%203.038.0%20002.76.0l5.51-3.209c.25-.123.441-.338.535-.599L111%2048z%22%20fill=%22url(%23c)%22/%3E%3Cpath%20fill-rule=%22evenodd%22%20clip-rule=%22evenodd%22%20d=%22M109.533%2040.686c-6.925%203.665-17.69%203.562-24.4-.311-6.892-3.98-6.892-10.431.0-14.41%201.422-.822%203.026-1.473%204.737-1.955-17.595-6.637-41.42-5.496-56.87%203.424-17.72%2010.23-17.72%2026.815.0%2037.044%2017.719%2010.23%2046.447%2010.23%2064.167.0%2011.194-6.462%2015.316-15.461%2012.366-23.792z%22%20fill=%22url(%23d)%22/%3E%3Cg%20opacity=%22.7%22%20filter=%22url(%23e)%22%3E%3Ccircle%20r=%2237.046%22%20transform=%22scale(1.22477%20.70706)%20rotate(45%20-55.303%2098.057)%22%20fill=%22url(%23f)%22/%3E%3C/g%3E%3Cpath%20fill-rule=%22evenodd%22%20clip-rule=%22evenodd%22%20d=%22M96.321%2027.615a8.615%208.615.0%2001-2.019-.824c-2.848-1.644-2.848-4.31.0-5.954%201.296-.748%202.958-1.156%204.653-1.223a41.764%2041.764.0%2000-1.788-1.092c-17.72-10.23-46.448-10.23-64.168.0-17.72%2010.23-17.72%2026.814.0%2037.044s46.448%2010.23%2064.168.0c8.025-4.633%2012.416-10.57%2013.172-16.63-4.598%201.417-10.442%201.007-14.318-1.23-4.746-2.74-4.746-7.183.0-9.923.099-.057.199-.113.3-.168zm9.666-1.923a2.064%202.064.0%2001-.068.076l.139.01c-.023-.03-.047-.058-.071-.086z%22%20fill=%22url(%23g)%22/%3E%3Ccircle%20r=%222%22%20transform=%22matrix(.86604%20.49997%20-.86604%20.49997%2062.464%2051)%22%20fill=%22%23121212%22/%3E%3Ccircle%20r=%222%22%20transform=%22matrix(.86604%20.49997%20-.86604%20.49997%2081.464%2045)%22%20fill=%22%23121212%22/%3E%3Ccircle%20r=%222%22%20transform=%22matrix(.86604%20.49997%20-.86604%20.49997%2043.642%2031)%22%20fill=%22%23121212%22/%3E%3Ccircle%20r=%222%22%20transform=%22matrix(.86604%20.49997%20-.86604%20.49997%2039.464%2045)%22%20fill=%22%23121212%22/%3E%3Ccircle%20r=%222%22%20transform=%22scale(1.22477%20.70706)%20rotate(45%20-12.95%2084.623)%22%20fill=%22%23121212%22/%3E%3Ccircle%20r=%222%22%20transform=%22matrix(.86604%20.49997%20-.86604%20.49997%2062.464%2035)%22%20fill=%22%23121212%22/%3E%3Cdefs%3E%3ClinearGradient%20id=%22a%22%20x1=%2265.415%22%20y1=%22133.384%22%20x2=%2262.707%22%20y2=%22116.141%22%20gradientUnits=%22userSpaceOnUse%22%3E%3Cstop%20stop-color=%22%23bebebe%22/%3E%3Cstop%20offset=%221%22%20stop-color=%22%23fff%22/%3E%3C/linearGradient%3E%3ClinearGradient%20id=%22b%22%20x1=%2265.415%22%20y1=%22126.531%22%20x2=%2257.672%22%20y2=%22104.287%22%20gradientUnits=%22userSpaceOnUse%22%3E%3Cstop%20stop-color=%22%23bebebe%22/%3E%3Cstop%20offset=%221%22%20stop-color=%22%23fff%22/%3E%3C/linearGradient%3E%3ClinearGradient%20id=%22c%22%20x1=%2265.409%22%20y1=%22107.427%22%20x2=%2265.409%22%20y2=%2274.173%22%20gradientUnits=%22userSpaceOnUse%22%3E%3Cstop%20stop-color=%22%23fff%22%20stop-opacity=%22.72%22/%3E%3Cstop%20offset=%221%22%20stop-color=%22%23fff%22%20stop-opacity=%220%22/%3E%3C/linearGradient%3E%3ClinearGradient%20id=%22d%22%20x1=%2265.007%22%20y1=%2270.496%22%20x2=%2261.493%22%20y2=%22.477%22%20gradientUnits=%22userSpaceOnUse%22%3E%3Cstop%20stop-color=%22%23edf2f9%22/%3E%3Cstop%20offset=%221%22%20stop-color=%22%23fff%22%20stop-opacity=%220%22/%3E%3C/linearGradient%3E%3ClinearGradient%20id=%22f%22%20x1=%2270.425%22%20y1=%2221.274%22%20x2=%22-.284%22%20y2=%2248.41%22%20gradientUnits=%22userSpaceOnUse%22%3E%3Cstop%20stop-color=%22%231efff1%22/%3E%3Cstop%20offset=%221%22%20stop-color=%22%231548ff%22/%3E%3C/linearGradient%3E%3ClinearGradient%20id=%22g%22%20x1=%2220.05%22%20y1=%2263.78%22%20x2=%2255.07%22%20y2=%22-9.969%22%20gradientUnits=%22userSpaceOnUse%22%3E%3Cstop%20offset=%22.156%22%20stop-color=%22%231efff1%22/%3E%3Cstop%20offset=%221%22%20stop-color=%22%231548ff%22/%3E%3C/linearGradient%3E%3Cfilter%20id=%22e%22%20x=%224.71%22%20y=%226.763%22%20width=%22120.747%22%20height=%2282.388%22%20filterUnits=%22userSpaceOnUse%22%20color-interpolation-filters=%22sRGB%22%3E%3CfeFlood%20flood-opacity=%220%22%20result=%22BackgroundImageFix%22/%3E%3CfeBlend%20in=%22SourceGraphic%22%20in2=%22BackgroundImageFix%22%20result=%22shape%22/%3E%3CfeGaussianBlur%20stdDeviation=%227.5%22%20result=%22effect1_foregroundBlur%22/%3E%3C/filter%3E%3C/defs%3E%3C/svg%3E)