Creating a Custom Service #
Let’s create a simple Echo service that receives a message and responds with that same message.
This tutorial was authored on Pragma Engine 0.6.0.
Unreal example project #
This tutorial is based on an example Unreal project using the Third Person Unreal C++ project template. The example project is named ‘Unicorn’, update references accordingly.
This tutorial was built and tested using Unreal 5.3.X, see the SDK overview for the full sdk compatibility chart.
This guide builds on the example project started in the Unreal SDK setup guide, which can be referenced regarding assumptions about project setup.
Relative paths #
Relative paths start from the pragma project directory or game engine project directory, respectively.
unicorn-lib\...->~\[pragma_repo_root_dir]\pragma-engine\platform\unicorn\unicorn-lib\...Plugins\PragmaSDK->~\[game_repo_root_dir]\Unicorn\Plugins\PragmaSDK
Overview #
Steps for authoring the Echo service:
- Define the Echo service
- Define the echoV1 RPC
- Build and run Pragma with our new service
- Test the echoV1 endpoint via the load-simulator
- Perform the SDK Generation step to generate bindings for the new service and RPC.
- Invoke the echoV1 RPC via from the game client via the SDK.
1. Define the Echo service #
- Create
EchoService.ktatunicorn-lib\src\main\kotlin\unicorn\echo\EchoService.kt - Add the following:
EchoService.kt
package unicorn.echo

import java.util.UUID
import pragma.PragmaNode
import pragma.services.DistributedService
import pragma.services.PragmaService
import pragma.settings.BackendType

@Suppress("UNUSED_PARAMETER") // suppress warning caused by reflection based invocation of Pragma RPCs
@PragmaService(backendTypes = [BackendType.GAME])
class EchoService(pragmaNode: PragmaNode, instanceId: UUID) : DistributedService(pragmaNode, instanceId) {

}
The engine identifies the @PragmaService annotation in order to initialize and register it. Services can be registered as GAME or SOCIAL types, which will dictate which Pragma nodes the service will run on.
2. Define the echoV1 RPC #
Define request and response protos #
- Create
echoRpc.protoatunicorn-protos\src\main\proto\unicorn\echo\echoRpc.proto - Add the following:
syntax = "proto3";

package unicorn.echo;
option csharp_namespace = "Unicorn.Echo";
option (pragma.unreal_namespace) = "Echo";
option (pragma.backend_type) = GAME;

import "pragmaOptions.proto";

message EchoV1Request {
  option (pragma.pragma_session_type) = PLAYER;
  option (pragma.pragma_message_type) = REQUEST;

  string message = 1;
}

message EchoV1Response {
  option (pragma.pragma_session_type) = PLAYER;
  option (pragma.pragma_message_type) = RESPONSE;

  string response_message = 1;
}
Build protos #
We’ll run the protobuf generation to make the request and response objects available to our service code.
- Run in git-bash from the
platformdirectory:./pragma build project-protos
Define the RPC Handler #
- Add the echoV1 method to handle the RPC request in the service:
EchoService.kt
package unicorn.echo

// ...

import pragma.PlayerSession
import pragma.rpcs.PragmaRPC
import pragma.rpcs.RoutingMethod
import pragma.rpcs.SessionType
import unicorn.echo.EchoRpc.EchoV1Request
import unicorn.echo.EchoRpc.EchoV1Response

@PragmaService(/**/)
class EchoService(/**/) {

   @PragmaRPC(SessionType.PLAYER, RoutingMethod.SESSION_PRAGMA_ID)
   suspend fun echoV1(session: PlayerSession, request: EchoV1Request): EchoV1Response {
       val response = EchoV1Response.newBuilder()
       response.setResponseMessage(request.message)
       return response.build()
   }

}
Run the conformance tests #
To confirm your proto and RPC handler are correct, run the conformance tests for a quick feedback loop.
- Open
ConformanceTest.ktlocated atunicorn-lib\src\test\kotlin\conformance\ConformanceTest.kt - Run the tests via the green play button in the editor next to
class ConformanceTest- The example code above is correct, but if you’re developing your own APIs, the error messages from the conformance tests will help identify any mismatches / missing conventions.
Run Pragma #
- Start Pragma with the Intellij
run-pragmarun configuration available in the drop-down in the upper right of the IDE.
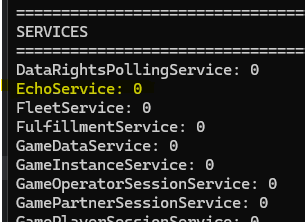
Once Pragma Engine successfully starts, you’ll see EchoService listed under the running services in the Game node startup output:
Test the Echo service #
Let’s test our service via the load simulator. The load simulator is a powerful tool for validating, testing, and exercising workflows and features within Pragma.
Open LoadSimulatorMain.kt at unicorn-load-simulator\src\main\kotlin\LoadSimulatorMain.kt
We’ll add a call to our new RPC from within the example step provided within the file.
LoadSimulatorMain.kt
// ...
import unicorn.echo.EchoRpc.EchoV1Request
import unicorn.echo.EchoRpc.EchoV1Response

class ExampleStep(/**/) : Step(/**/) {

    override suspend fun runStep(/**/) {
        // ... existing example code

        val echoRequest = EchoV1Request.newBuilder().setMessage("hello world!").build()
        val echoResponse = leader.game.sendOrThrow(echoRequest, EchoV1Response::class, tracker)
        println("EchoV1 - ${leader.displayName.displayName}: ${echoResponse.responseMessage}")
    }

}
- Start the load simulator via the
run-load-simulatorIntellij run configuration (located in a dropdown in the top right) - Observe the output of the echoV1 response streaming during the simulation run:
EchoV1 - LoadSimulatorPlayer1: hello world!
- Success!
Call echoV1 from the game client #
Now that we know our EchoV1 RPC is working, let’s call it from the game client.
Switch to a new git-bash terminal in your game code. If using Rider, you can launch this terminal window within the IDE.
# new git-bash terminal
cd ~/Unreal/Unicorn
Run update-pragma-sdk.sh in git bash from the game engine plugins directory
cd Plugins

# this will run the sdk generation step and then copy the updated plugin sources to the plugin dir
./update-pragma-sdk.sh
- Now that our new EchoV1 RPC is available in the sdk, let’s add an exec function to call it!
Source\Unicorn\UnicornPlayerController.h
// ...
class UNICORN_API AUnicornPlayerController : public APlayerController
{
    // ...

    public:
        UFUNCTION(Exec)
        void Echo(const FString& Message);

   // ...
}
Source\Unicorn\UnicornPlayerController.cpp
// ...

#include "Dto/PragmaEchoRpcDto.h"
#include "Dto/UnicornEchoServiceRaw.h"

// ...

void AUnicornPlayerController::Echo(const FString& Message)
{
    const FPragma_Echo_EchoV1Request request = FPragma_Echo_EchoV1Request {
        { Message }
    };
    Player->Api<UUnicornEchoServiceRaw>().EchoV1(request, UUnicornEchoServiceRaw::FEchoV1Delegate::CreateWeakLambda(
        this, [this](const TPragmaResult<FPragma_Echo_EchoV1Response>& EchoResult, const FPragmaMessageMetadata&)
        {
            if (EchoResult.IsSuccessful())
            {
                UE_LOG(LogTemp
                    , Display
                    , TEXT("Pragma -- EchoV1 response: %s")
                    , *EchoResult.Payload<FPragma_Echo_EchoV1Response>().ResponseMessage);
            } else
            {
                UE_LOG(LogTemp, Display, TEXT("Pragma -- EchoV1 something went wrong: %s"), *EchoResult.GetErrorAsString());
            }
        })
    );
}
Run the game #
- Ensure Pragma is running via
./pragma runor the Intellijrun-pragmarun configuration. - Run the game
- Call the
Echoexec function- Open the console with backtick in the running game window and type
Echo hello world!
- Open the console with backtick in the running game window and type
- Confirm the echo response in the log
Pragma -- EchoV1 response: hello world!
- Success!
%22/%3E%3Cpath%20d=%22M82%20113.698c1.821%201.063%201.834%202.78.0%203.843l-13.084%207.687a7.17%207.17.0%2001-3.284.798%207.17%207.17.0%2001-3.284-.798l-13.16-7.687c-1.821-1.063-1.834-2.78.0-3.843l13.084-7.687a7.168%207.168.0%20016.568.0L82%20113.698z%22%20fill=%22url(%23b)%22/%3E%3Cpath%20d=%22M73.16%20114.658a.985.985.0%2001.487.368%201.037%201.037.0%20010%201.186.981.981.0%2001-.486.369l-6.383%203.846a3.438%203.438.0%2001-3.198.0l-6.42-3.846a.982.982.0%2001-.486-.369%201.035%201.035.0%20010-1.186.986.986.0%2001.486-.368l6.383-3.846a3.438%203.438.0%20013.198.0l6.42%203.846z%22%20fill=%22%23fff%22/%3E%3Cpath%20d=%22M111%2048c-1.455-.642-37.943-12.532-45.55-14.5-7.607%202.022-43.495%2016.358-44.95%2017l37.504%2065.718c.106.239.291.435.524.556l5.542%203.209a3.038%203.038.0%20002.76.0l5.51-3.209c.25-.123.441-.338.535-.599L111%2048z%22%20fill=%22url(%23c)%22/%3E%3Cpath%20fill-rule=%22evenodd%22%20clip-rule=%22evenodd%22%20d=%22M109.533%2040.686c-6.925%203.665-17.69%203.562-24.4-.311-6.892-3.98-6.892-10.431.0-14.41%201.422-.822%203.026-1.473%204.737-1.955-17.595-6.637-41.42-5.496-56.87%203.424-17.72%2010.23-17.72%2026.815.0%2037.044%2017.719%2010.23%2046.447%2010.23%2064.167.0%2011.194-6.462%2015.316-15.461%2012.366-23.792z%22%20fill=%22url(%23d)%22/%3E%3Cg%20opacity=%22.7%22%20filter=%22url(%23e)%22%3E%3Ccircle%20r=%2237.046%22%20transform=%22scale(1.22477%20.70706)%20rotate(45%20-55.303%2098.057)%22%20fill=%22url(%23f)%22/%3E%3C/g%3E%3Cpath%20fill-rule=%22evenodd%22%20clip-rule=%22evenodd%22%20d=%22M96.321%2027.615a8.615%208.615.0%2001-2.019-.824c-2.848-1.644-2.848-4.31.0-5.954%201.296-.748%202.958-1.156%204.653-1.223a41.764%2041.764.0%2000-1.788-1.092c-17.72-10.23-46.448-10.23-64.168.0-17.72%2010.23-17.72%2026.814.0%2037.044s46.448%2010.23%2064.168.0c8.025-4.633%2012.416-10.57%2013.172-16.63-4.598%201.417-10.442%201.007-14.318-1.23-4.746-2.74-4.746-7.183.0-9.923.099-.057.199-.113.3-.168zm9.666-1.923a2.064%202.064.0%2001-.068.076l.139.01c-.023-.03-.047-.058-.071-.086z%22%20fill=%22url(%23g)%22/%3E%3Ccircle%20r=%222%22%20transform=%22matrix(.86604%20.49997%20-.86604%20.49997%2062.464%2051)%22%20fill=%22%23121212%22/%3E%3Ccircle%20r=%222%22%20transform=%22matrix(.86604%20.49997%20-.86604%20.49997%2081.464%2045)%22%20fill=%22%23121212%22/%3E%3Ccircle%20r=%222%22%20transform=%22matrix(.86604%20.49997%20-.86604%20.49997%2043.642%2031)%22%20fill=%22%23121212%22/%3E%3Ccircle%20r=%222%22%20transform=%22matrix(.86604%20.49997%20-.86604%20.49997%2039.464%2045)%22%20fill=%22%23121212%22/%3E%3Ccircle%20r=%222%22%20transform=%22scale(1.22477%20.70706)%20rotate(45%20-12.95%2084.623)%22%20fill=%22%23121212%22/%3E%3Ccircle%20r=%222%22%20transform=%22matrix(.86604%20.49997%20-.86604%20.49997%2062.464%2035)%22%20fill=%22%23121212%22/%3E%3Cdefs%3E%3ClinearGradient%20id=%22a%22%20x1=%2265.415%22%20y1=%22133.384%22%20x2=%2262.707%22%20y2=%22116.141%22%20gradientUnits=%22userSpaceOnUse%22%3E%3Cstop%20stop-color=%22%23bebebe%22/%3E%3Cstop%20offset=%221%22%20stop-color=%22%23fff%22/%3E%3C/linearGradient%3E%3ClinearGradient%20id=%22b%22%20x1=%2265.415%22%20y1=%22126.531%22%20x2=%2257.672%22%20y2=%22104.287%22%20gradientUnits=%22userSpaceOnUse%22%3E%3Cstop%20stop-color=%22%23bebebe%22/%3E%3Cstop%20offset=%221%22%20stop-color=%22%23fff%22/%3E%3C/linearGradient%3E%3ClinearGradient%20id=%22c%22%20x1=%2265.409%22%20y1=%22107.427%22%20x2=%2265.409%22%20y2=%2274.173%22%20gradientUnits=%22userSpaceOnUse%22%3E%3Cstop%20stop-color=%22%23fff%22%20stop-opacity=%22.72%22/%3E%3Cstop%20offset=%221%22%20stop-color=%22%23fff%22%20stop-opacity=%220%22/%3E%3C/linearGradient%3E%3ClinearGradient%20id=%22d%22%20x1=%2265.007%22%20y1=%2270.496%22%20x2=%2261.493%22%20y2=%22.477%22%20gradientUnits=%22userSpaceOnUse%22%3E%3Cstop%20stop-color=%22%23edf2f9%22/%3E%3Cstop%20offset=%221%22%20stop-color=%22%23fff%22%20stop-opacity=%220%22/%3E%3C/linearGradient%3E%3ClinearGradient%20id=%22f%22%20x1=%2270.425%22%20y1=%2221.274%22%20x2=%22-.284%22%20y2=%2248.41%22%20gradientUnits=%22userSpaceOnUse%22%3E%3Cstop%20stop-color=%22%231efff1%22/%3E%3Cstop%20offset=%221%22%20stop-color=%22%231548ff%22/%3E%3C/linearGradient%3E%3ClinearGradient%20id=%22g%22%20x1=%2220.05%22%20y1=%2263.78%22%20x2=%2255.07%22%20y2=%22-9.969%22%20gradientUnits=%22userSpaceOnUse%22%3E%3Cstop%20offset=%22.156%22%20stop-color=%22%231efff1%22/%3E%3Cstop%20offset=%221%22%20stop-color=%22%231548ff%22/%3E%3C/linearGradient%3E%3Cfilter%20id=%22e%22%20x=%224.71%22%20y=%226.763%22%20width=%22120.747%22%20height=%2282.388%22%20filterUnits=%22userSpaceOnUse%22%20color-interpolation-filters=%22sRGB%22%3E%3CfeFlood%20flood-opacity=%220%22%20result=%22BackgroundImageFix%22/%3E%3CfeBlend%20in=%22SourceGraphic%22%20in2=%22BackgroundImageFix%22%20result=%22shape%22/%3E%3CfeGaussianBlur%20stdDeviation=%227.5%22%20result=%22effect1_foregroundBlur%22/%3E%3C/filter%3E%3C/defs%3E%3C/svg%3E)