Invite Steam Friends #

In this section, we’ll create a Pragma Engine Party and invite a friend to join via Steam. Note that either a VM or two machines are required, along with two Steam accounts.

Prerequisites:


Set up the environment with two players #

To form a party, we’ll need a minimum of 2 players each with their own Steam account. Since we can’t log into Steam more than once from the same machine, we either need a Virtual Machine (VM) or two physical PCs.

  • If running in a VM, the guest OS will need to access the host machine, so we’ll need the IP address of the host machine as seen by the guest. The host machine will run a local instance of Pragma Engine.
  • If running on physical machines, they will need to be on the same Local Area Network. One of the machines will run a local instance of Pragma Engine.
  1. Get the IP address of the machine running Pragma Engine.
    • VM: run ipconfig in Windows Command Prompt on the guest machine. Assuming you have set up the VM’s Network Interface Card correctly, the Default Gateway field is the IP address of the host machine as seen by the VM.
    • Physical machines: run ipconfig on the machine that is running Pragma Engine.
  2. Configure Pragma Engine to broadcast the correct IP address by inserting the following code into pragma-engine/platform/<PROJECT>/config/local-dev.yml:
    game:
      serviceConfigs:
        GameOperatorGatewayConfig:
          authenticateHost: "[your-ip-address]"
          socialHost: "[your-ip-address]"
          gameHost: "[your-ip-address]"
        GamePartnerGatewayConfig:
          authenticateHost: "[your-ip-address]"
          socialHost: "[your-ip-address]"
          gameHost: "[your-ip-address]"
        GamePlayerGatewayConfig:
          authenticateHost: "[your-ip-address]"
          socialHost: "[your-ip-address]"
          gameHost: "[your-ip-address]"
    
    Replace [your-ip-address] with the actual IP address you obtained.
  3. Open Assets/Pragma.json located in your Unity project directory. Change the value of backendAddress to http://[your-ip-address]:10000.

Create the PartyManager.cs script #

  1. Navigate to the Assets/Scripts folder in your Unity project directory. Create a new C# script named PartyManager.cs and open it.
  2. Paste the code from the following dropdown into the PartyManager.cs script:
PartyManager script
using System.Collections;
using System.Collections.Generic;
using UnityEngine;
using Pragma;
using Pragma.Party;
using Steamworks;
using UnityEngine.UI;
using Pragma.MatchLifecycle;

public class PartyManager : MonoBehaviour
{
    private PragmaManager pragmaManager;
    private IParty partyData;
    private bool inviteAccepted = false;

    [SerializeField] private Text partyCode;
    [SerializeField] private Text[] partySlots;
    [SerializeField] private GameObject playerJoinedNotification;
    [SerializeField] private Text friendNameJoinedText;

    // Start is called before the first frame update
    void Start()
    {
        pragmaManager = this.GetComponent<PragmaManager>();

        SubscribeToEvents();
    }

    // Update is called once per frame
    void Update()
    {

    }

    public void CreateParty()
    {
        if (pragmaManager.session.Party.CanCreateParty())
        {
            ExtCreateRequest newParty = new ExtCreateRequest();
            ExtPlayerJoinRequest newPlayerJoinRequest = new ExtPlayerJoinRequest ();
            pragmaManager.session.Party.CreateParty(newParty,  newPlayerJoinRequest, response =>
            {
                if (response.IsSuccessful)
                {
                    partyData = pragmaManager.session.Party.Party;
                    partyCode.text = "Party Invite Code: \n" + partyData. InviteCode;
                }
            });
        }
    }

    public void InviteButton()
    {
        if (SteamManager.Initialized)
        {
            Debug.Log("SendingInvite");
            string partyDataString = $"steamPartyInviteAccepted,{partyData. InviteCode}";
            SteamFriends.ActivateGameOverlayInviteDialogConnectString (partyDataString);
        }
    }

    private void SteamInviteAccepted(GameRichPresenceJoinRequested_t param)
    {
        Debug.Log("Steam Invite Callback triggered");
        Debug.Log("RichConnect string passed: " + param.m_rgchConnect);

        //Parse the string
        string[] richPresenceString = param.m_rgchConnect.Split(',');
        string inviteIdString = richPresenceString[1];

        Debug.Log(inviteIdString);
        
        if (pragmaManager.session.Party.CanJoinParty())
        {
            inviteAccepted = true;
            ExtPlayerJoinRequest joinWithInviteCodeRequest = new  ExtPlayerJoinRequest();
            pragmaManager.session.Party.JoinWithInviteCode (joinWithInviteCodeRequest, inviteIdString, response =>
            {
                if (response.IsSuccessful)
                {
                    Debug.Log("We should be joining a party!");
                }
                else
                {
                    Debug.Log(response.Error);
                    Debug.Log("Error Code: " + response.ErrorCode);
                }
            });
        }
        else
        {
            Debug.Log("Cannot join party for some reason");
        }
    }

    private void SubscribeToEvents()
    {
        if (pragmaManager.session != null)
        {
            pragmaManager.session.Party.OnPartyDataChanged += OnPartyJoined;
            pragmaManager.session.Party.OnPartyJoined += OnPartyJoined;
            pragmaManager.session.Party.OnPartyLeft += OnPartyLeft;
            pragmaManager.session.Party.OnPlayerJoined += OnPlayerJoined;
            pragmaManager.session.Party.OnPlayersChanged += OnPlayersChanged;
        }

        if (SteamManager.Initialized)
        {
            Debug.Log("Subscribing to Steam Callback");
            Callback<GameRichPresenceJoinRequested_t>.Create (SteamInviteAccepted);
        }
    }

    private void UnsubscribeFromEvents()
    {
        if (pragmaManager.session != null)
        {
            pragmaManager.session.Party.OnPartyJoined -= OnPartyJoined;
            pragmaManager.session.Party.OnPartyDataChanged -=  OnPartyDataChanged;
            pragmaManager.session.Party.OnPartyLeft -= OnPartyLeft;
            pragmaManager.session.Party.OnPlayerJoined -= OnPlayerJoined;
            pragmaManager.session.Party.OnPlayersChanged -= OnPlayersChanged;
        }
    }

    private void OnPartyJoined(IParty partyJoinedData)
    {
        Debug.Log("OnPartyJoined");
        Debug.Log(partyCode.text);
        Debug.Log(partyJoinedData);
    }

    private void OnPartyDataChanged(IParty partyChangedData)
    {
        Debug.Log("OnPartyDataChanged");
        partyCode.text = partyChangedData.InviteCode;
    }

    private void OnPlayersChanged(IReadOnlyList<IPartyPlayer> playerList)
    {
        Debug.Log("OnPlayersChanged");
        int playerCount = 0;
        foreach (var player in playerList)
        {
            partySlots[playerCount].text = player.DisplayName.DisplayName_;
            playerCount++;
        }
    }

    private void OnPlayerJoined(IPartyPlayer player)
    {
        Debug.Log("OnplayerJoined");
        if (!inviteAccepted)
        {
            if (player.PragmaId != pragmaManager.Player.PragmaId)
            {
                Debug.Log(player.DisplayName.DisplayName_ + " has joined the  Party");
            }
        }
    }

    public void testButton()
    {
        //Pop off the notification
        friendNameJoinedText.text = pragmaManager.Player.FullDisplayName + "  has joined the Party";
        playerJoinedNotification.SetActive(true);
    }

    private void OnPartyLeft()
    {
        Debug.Log("OnPartyLeft");
        inviteAccepted = false;
    }
}
  1. Open the PragmaManager.cs script and add a partyManager class variable:

    private PartyManager partyManager;
    
  2. Initialize partyManager class variable in the Start() method:

    void Start()
    {
        partyManager = this.GetComponent<PartyManager>();
    
        // ...
    }
    
  3. Configure the game client to immediately create a party after login by calling partyManager.CreateParty() in the HandleConnected() method:

    private void HandleConnected()
    {
         partyManager.CreateParty();
    
         // ...
    }
    

Attach the PartyManager.cs script and create the invite UI #

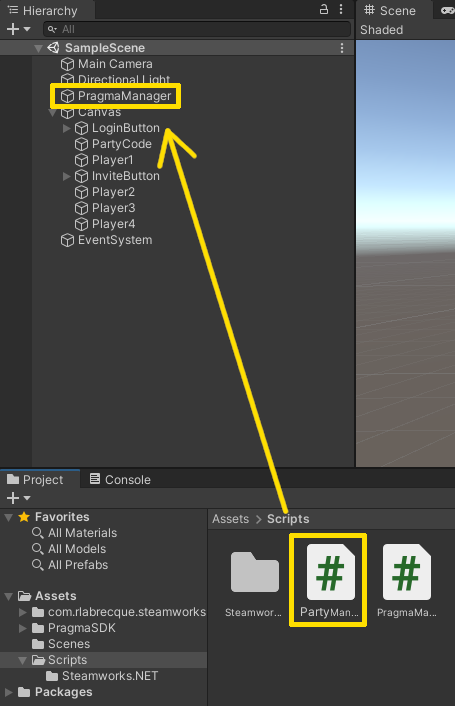
  1. Drag the PartyManager.cs script onto the PragmaManager GameObject.

  2. Create an invite button by right clicking the Hierarchy pane, selecting UI, then Button. Name it InviteButton, then change its text to read Invite.

  3. Hook up the Invite button to the invite function by clicking on InviteButton in the Hierarchy pane, then scrolling down in the Inspector pane to the On Click () section. Select PragmaManager, then select the PartyManager.InviteButton method.

  4. Create a text field for the party code by right clicking the Hierarchy pane, selecting UI, then Text. Name this text field PartyCode, and change its value to Party Code: ******.

  5. Create four new text fields by right clicking the Hierarchy pane, selecting UI, then Text. Name these text fields Player1through Player4, then change the value of the text fields to Player 1 through Player 4.

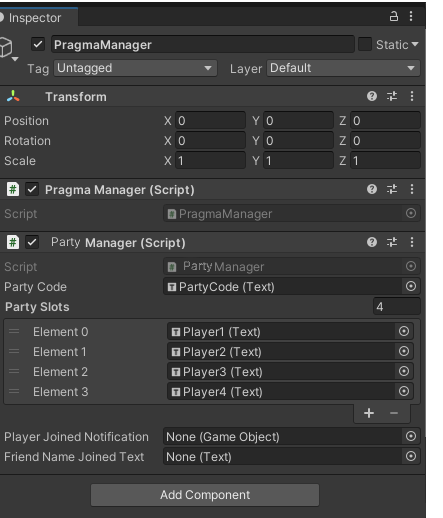
  6. Click on PragmaManager in the Hierarchy pane, then in the Inspector pane, change the value of Party Slots to 4.

  7. Hook up the text fields to the PragmaManager GameObject by finding the Party Manager (Script) section in the Inspector pane, and connecting all corresponding text fields as follows:

    • Under Party Code, select the PartyCode (Text) object.
    • Under Party Slots, you should see four elements listed. Select Player1 (Text) for Element 0, Player2 (Text) for Element 1, and so on.

Set up Unity Editor to create builds #

The standard Unity Editor build flow does not copy the steam_appid.txt and Pragma.json files, so we’ll add a build menu to customize the build process.

  1. Create a directory at [Your unity project]/Assets/Editor/BuildTools. You may need to create the Editor directory first.
  2. In the BuildTools directory, create a new C# script named BuildPostProcess.cs.
  3. Open BuildPostProcess.cs and insert the code in the following dropdown:
    BuildPostProcess script
    // C# example.
    using UnityEditor;
    using System.Diagnostics;
    using System.IO;
    
    public class BuildPostProcess
    {
        [MenuItem("BuildTools/Windows Build With Postprocess")]
        public static void BuildGame()
        {
            // Get filename
            string path = EditorUtility.SaveFolderPanel("Choose Location of Built Game", "", "");
            string[] levels = new string[] { "Assets/Scenes/MainMenu.unity" };
    
            // Build player
            BuildPipeline.BuildPlayer(levels, path + "/BuiltGame.exe", BuildTarget.StandaloneWindows64, BuildOptions.None);
    
            // Copy a file from the project folder to the build folder, alongside the built game
            Directory.CreateDirectory(path + "/BuiltGame_Data");
            FileUtil.ReplaceFile("steam_appid.txt", path + "/steam_appid.txt");
            FileUtil.ReplaceFile("Assets/Pragma.json", path + "/BuiltGame_Data/Pragma.json");
    
            // Run the game (Process class from System.Diagnostics).
            Process proc = new Process();
            proc.StartInfo.FileName = path + "/BuiltGame.exe";
            proc.Start();
        }
    
        [MenuItem("BuildTools/Mac Build")]
        public static void BuildGameMac()
        {
            // Get filename
            string path = EditorUtility.SaveFolderPanel("Choose Location of Built Game", "", "");
            string[] levels = { "Assets/Scenes/MainMenu.unity" };
    
            // Build player
            BuildPipeline.BuildPlayer(levels, path + "/BuiltGame", BuildTarget.StandaloneOSX, BuildOptions.None);
    
            // Copy a file from the project folder to the build folder, alongside the built game
            Directory.CreateDirectory(path + "/BuiltGame.app/Contents");
            FileUtil.ReplaceFile("steam_appid.txt", path + "/steam_appid.txt");
            FileUtil.ReplaceFile("Assets/Pragma.json", path + "/BuiltGame.app/Contents/Pragma.json");
        }
    }
    
  4. Switch back to Unity Editor. After BuildPostProcess.cs is loaded, you should see a new BuildTools menu. We’ll use this menu to build a standalone version of our game.

Test out the Steam friend invite feature #

This guide assumes that you have already uploaded a build of your game to Steam. Consult Valve’s official Steam documentation for further assistance.
  1. Start Pragma Engine on your primary machine.
  2. Launch Steam and sign into an account that has access to your game.
  3. In your Steam Library, right click on your game and select Manage then Browse local files.
  4. Temporarily move all the files in this directory to another location.
  5. In Unity Editor, go to the BuildTools menu, then select the appropriate build option for your OS. Choose your game’s Steam directory as the output location (Steam/steamapps/common/[your-game]).
  6. On a second machine or virtual machine, log into a second Steam account that also has access to your game. Ensure that the two accounts are friends.
  7. Delete and replace the Steam game files with the newly-built Unity standalone game.
  8. Launch your game via Steam on both machines.
  9. When the game has launched, click the Login button on each machine.
  10. Click the Invite button on one of the clients and invite the other player.
  11. Accept the invite. Both clients should now see each other as having joined the same party.