Creating a Basic Custom Service #
To demonstrate the basic steps to create a custom service, we’ll be building a simple Echo service that receives a payload containing a message and responds with that same message.
This tutorial uses Pragma Engine 0.4.0.
Build Pragma Engine #
You must have Pragma Engine and its associated protos A format for efficiently serializing structured data that's cross-platform and compatible with several languages. built.
Run the following commands in the terminal from the platform directory:
./pragma build engine -s
./pragma build
Define service calls with protobufs #
Before writing any business logic, we’ll define the structure of the service calls for our simple service. Because our Echo service only receives a message and echos it back, it only has one request and one response.
Define protos for an Echo service #
Create a
echoRpc.protofile atpragma-engine/platform/<PROJECT>/<PROJECT>-protos/src/main/proto/demo/echo/echoRpc.proto. You will need to create the directories fordemoandecho.Add the following code into
echoRpc.proto:syntax = "proto3"; package demo.echo; option csharp_namespace = "Demo.Echo"; option (pragma.unreal_namespace) = "Echo"; import "pragmaOptions.proto"; message EchoV1Request { option (pragma.pragma_session_type) = PLAYER; option (pragma.pragma_message_type) = REQUEST; string message = 1; } message EchoV1Response { option (pragma.pragma_session_type) = PLAYER; option (pragma.pragma_message_type) = RESPONSE; string response_message = 1; }
Build protos #
We now need to compile the new proto before we author our business logic. Run the following command in the terminal from the platform directory:
./pragma build project-protos
Create the Echo service #
Now we’ll author the code that constitutes our custom Echo service.
- Create a
EchoService.ktKotlin file atpragma-engine/platform/<PROJECT>/<PROJECT>-lib/src/main/kotlin/demo/echo/EchoService.kt. You will need to create the directories fordemoandecho.
You may have to mark the Kotlin directory as a sources root first.
Add the following code to
EchoService.kt. Import classes as necessary.@PragmaService(backendTypes = [BackendType.GAME]) class EchoService(pragmaNode: PragmaNode, instanceId: UUID) : DistributedService(pragmaNode, instanceId), ConfigHandler<EchoServiceConfig> { private lateinit var config: EchoServiceConfig override suspend fun onConfigChanged(serviceConfig: EchoServiceConfig) { config = serviceConfig } @PragmaRPC(SessionType.PLAYER, RoutingMethod.SESSION_PRAGMA_ID) suspend fun echoV1( session: PlayerSession, request: EchoV1Request ): EchoV1Response { val message = request.message return EchoV1Response.newBuilder() .setResponseMessage("response: $message") .build() } }
Create a configuration file
EchoServiceConfig.ktin the same directory asEchoService.kt.Add the following code to
EchoServiceConfig.kt. Import classes as necessary.class EchoServiceConfig private constructor(type: BackendType) : ServiceConfig<EchoServiceConfig>(type) { override val description = "Configuration for the Echo Service" companion object : ConfigBackendModeFactory<EchoServiceConfig> { override fun getFor(type: BackendType): EchoServiceConfig { return EchoServiceConfig(type) } } }
Build and run Pragma Engine #
Now that you’ve finished the Echo service, rebuild and run Pragma:
./pragma build engine -s
./pragma build
./pragma run
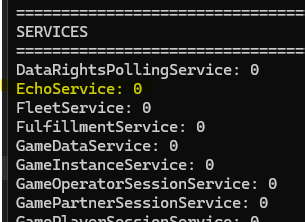
Once Pragma Engine successfully starts, you’ll see EchoService listed under the running services in your terminal:
Test the Echo service #
You can test the Echo service using Postman.
Open Postman. If necessary, import the latest Postman collection and environment from the
pragma-engine/platform/devenv/postmandirectory.Send
PragmaDev ➨ Public ➨ GetInQueuev1to enter the login queue.Log in as a player by sending
Player - AuthenticateOrCreateV2.Navigate to
PragmaDev ➨ Game ➨ RPC - Player ➨ Telemetry. Duplicate thePlayerEventV1service call and name itEchoV1.If you duplicate the
PlayerEventV1service call outside the Telemetry folder, additional setup is required to make theEchoV1service call work:In the new
EchoV1service call, click the Auth tab and change the type to Bearer Token. In the Token field, insert{{test01PragmaPlayerGameToken}}.In the Headers tab, uncheck the Accept key. Create a new Accept key and insert the value
application/json.
Open the
EchoV1call and replace its body with the following JSON:{ "requestId": 1, "type": "EchoRpc.EchoV1Request", "payload": { "message": "Hello there!" } }Click the send button. You should receive a response that looks like the following:
{
    "sequenceNumber": 0,
    "response": {
        "requestId": 1,
        "type": "EchoRpc.EchoV1Response",
        "payload": {
            "responseMessage": "response: Hello there!"
        }
    }
}
Appendix #
You can view the completed source code files for this section here.
