
This article was written on Pragma Engine version 0.0.94.
Creating a Custom Service #
In the second article of this series, we’ll demonstrate how to create a custom service by going over how to construct RPC protobufs, generate RPCs for Unity and Unreal, and build custom service logic in Kotlin for a custom Echo service, which simply echoes back strings to players.
For more information, check out the Creating a Basic Custom Service tutorial to learn more about implementing a custom Echo service.
Construct RPC protobufs #
The protobuf IDL is used throughout Pragma Engine to define how data is saved to the database and the data template of RPCs. When making a custom service, you’ll use protos for defining your custom service’s RPCs. To define your RPCs, you’ll need to create proto messages for the request and response ends of the calls.
How to construct RPC protos in Pragma Engine.
For an introduction on how we use protos in Pragma Engine, check out the Protocol Buffers section in the Content Data series.
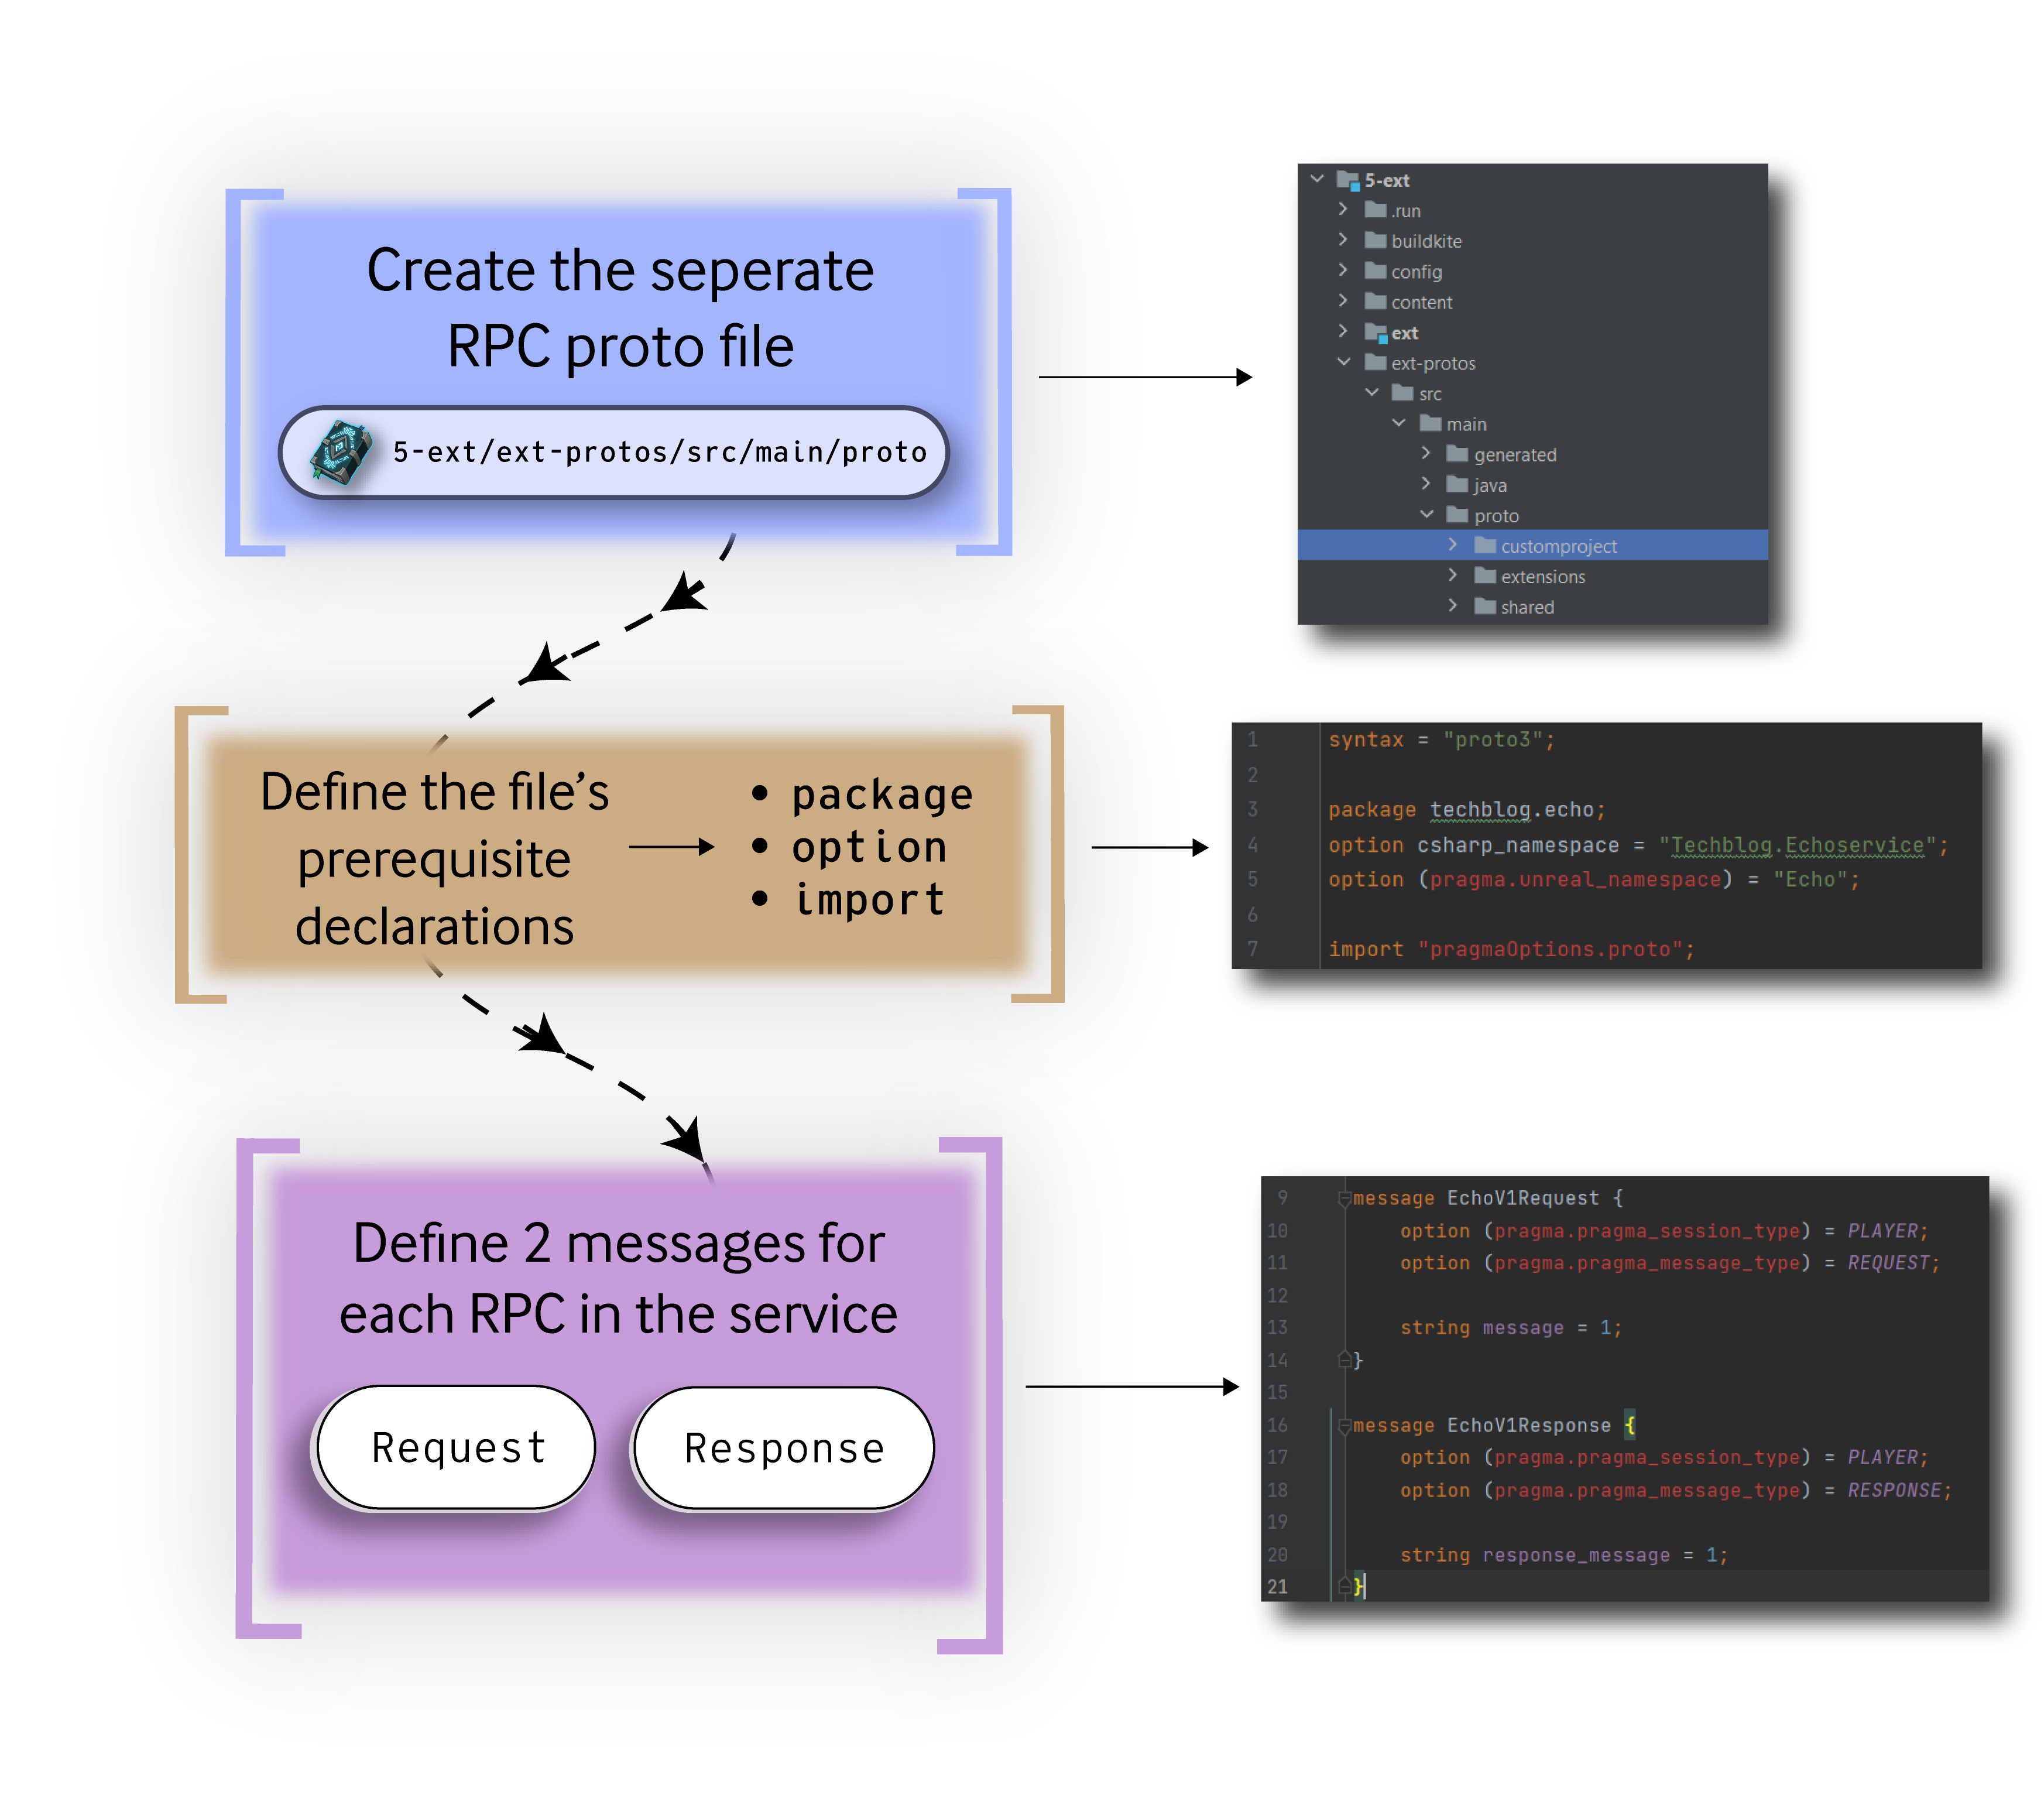
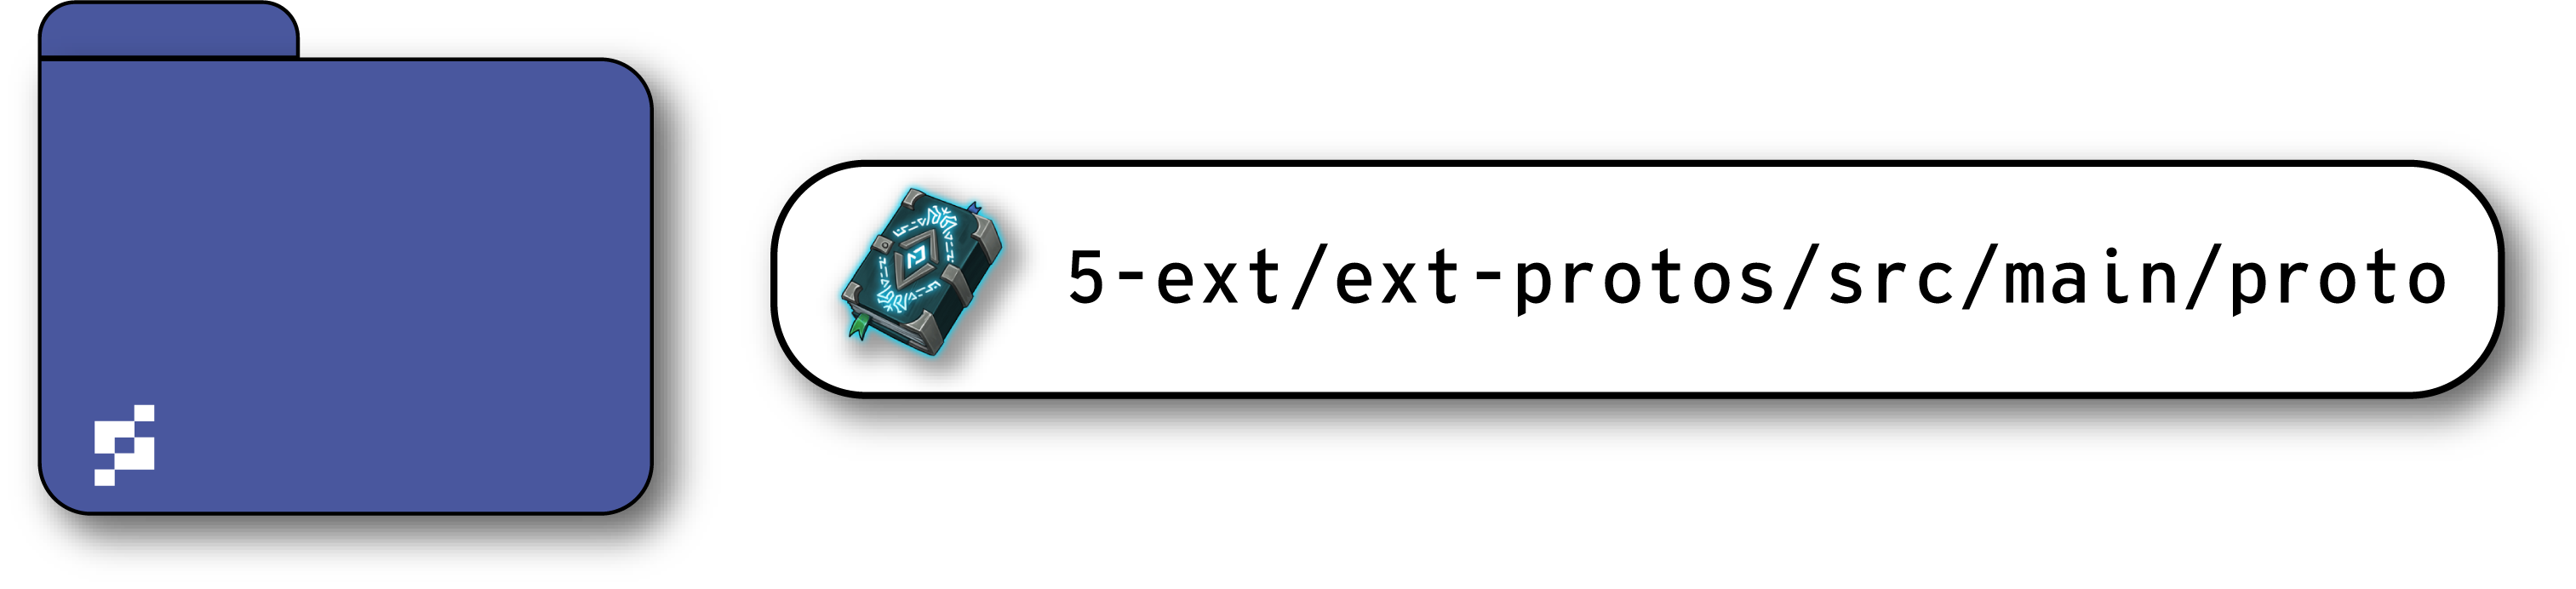
All protos are created and modified in 5-ext/ext-protos/src/main/proto. This directory contains proto definitions for content and other types of data. If you’d like to separate your custom services protos from your Pragma Engine-provided content data protos, make sure you organize and create new directories to structure your different types of content.
Before we commence building the protos… #
First you’ll want to get your engine built and your 5-ext directory created. Remember that 5-ext is where you define all custom content.
Build the engine by running the following command in the terminal from the platform directory:
make skip-tests protos engine
Now run the next command to create a 5-ext folder (if you don’t have one already):
make ext
Proto Creation #
Defining the prerequisites #
You’ll need to use the first line of the file to define the proto’s syntax version, which will always be proto3 in Pragma Engine.
syntax = "proto3";
Then, define the necessary packages, options, and imports for your protos file.
packagespecifies instructions on where to generate the JSON packaged code from your proto definitions. You’ll use apackage’s destination to import files and code logic when defining your services and plugins in Kotlin.
| Pragma-Provided Content Package | Custom Content Package |
|---|---|
package pragma.inventory.ext; | package techblog.demoservice; |
optionis an individual declaration that Pragma Engine uses to specify how protos generate files in different languages for the PragmaSDK. Since the PragmaSDK uses Unreal and Unity, you’ll need to make two different option declarations for those SDKs’ respective languages.
| Unity | Unreal |
|---|---|
option csharp_namespace = "Techblog.Demoservice"; | option (pragma.unreal_namespace) = "Techblog"; |
importis used to reference any other protos that your definitions depend on (such as if you section off the way you organize and write your protos definitions). You’re always going to need to add animportdeclaration forpragmaOptions.proto, but it depends on your protos and file structure if you’ll need to add any additionalimports.
Required import for every proto | Additional import example |
|---|---|
import "pragmaOptions.proto"; | import "pragma/types.proto"; |
Writing proto logic for custom services #
Once you’ve defined all your proto’s prerequisites, we can get started on defining the custom service’s RPC templates!
Below your packages, options, and imports, create two separate messages: one for the RPC’s request, and the other for the RPC’s response. Name these messages with version indicators, so any errors with the calls can be handled in a backwards-compatible and efficient way. Naming them without a version indicator will also break conformance tests.
Below is an example of what that message might look like as a request:
message EchoV1Request {}
Inside each message’s curly brackets, add the following: an option to specify the call’s session type, an option to specify whether the call is a response or request, and the data-types included in the specific RPC’s code logic.
The option to specify the call’s session type can be defined using four separate session categories. Below is an example of how to implement the session type option with PLAYER as the chosen session type. You’ll also see a table below detailing how each of the four session categories operates in Pragma Engine’s RPC infrastructure.
option (pragma.pragma_session_type) = PLAYER;
| Session type | Description |
|---|---|
PLAYER | SDK or game client related, and involves RPCs directly initiated by players. This type of session is trusted as little as possible, and involves acquiring inventory data, activating a login scenario, exchanging items, and other player initiated calls. |
PARTNER | Involves game server systems and trusted third party RPCs, which are handy for granting items to a player’s inventory, provider entitlements, match end processes, and anything involving a third party system’s integration. One of the most trusted session types. |
OPERATOR | Administrative tasks such as bans, account management, customer support, inventory deletion, game title and shard creations, and more. Many Operator calls use this session type (such as updateItemsOperatorV1 for updating items). |
SERVICE | Completely internal, this session type is for communicative calls with service instances in Pragma Engine, such as queries for inventory and content data, data cache, authentication steps, and other instance data. It is frequently used by plugins. Make sure you know exactly what information you’re trying to send and receive when making a service RPC, as you’ll need to find and solve errors. |
Once the session type has been defined, create another option definition for the RPC’s message type, which will either be a request or a response. The code block below demonstrates how to implement the message type option with REQUEST as the chosen session type.
option (pragma.pragma_message_type) = REQUEST;
Don’t forget to always make two separate RPCmessages for the call’sREQUESTandRESPONSEoperations.
After both of the message’s options are implemented, define the data fields attached to your RPC message, if any. Sometimes these data types are strings or integers, while other times they can return specific custom content already authored in your protos template.
All of the actions above are demonstrated in the code block below using a custom Echo service.
syntax = "proto3";

package techblog.echo;
option csharp_namespace = "Techblog.Echoservice";
option (pragma.unreal_namespace) = "Echo";

import "pragmaOptions.proto";

message EchoV1Request {
    option (pragma.pragma_session_type) = PLAYER;
    option (pragma.pragma_message_type) = REQUEST;

    string message = 1;
}

message EchoV1Response {
    option (pragma.pragma_session_type) = PLAYER;
    option (pragma.pragma_message_type) = RESPONSE;

    string response_message = 1;
}
Making our proto definitions in 5-ext #
Whenever you define new or edit existing content in protos (such as RPC messages), you’ll need to do the following make command using platform as the working directory.
make ext-protos
By running the make command above, our protos are built into 5-ext so they can be accessed by the rest of Pragma Engine.
Generate the RPCs for Unity and Unreal #
When you create RPC protobufs for a custom service, you’ll also need to generate those protos for your PragmaSDK. These RPC definitions will work just fine for internal Pragma Engine processes, but integrating a custom service fully with your SDK requires the RPCs be generated with the relevant engine language.
All you’ll need to do to generate the protos for your SDK is run the same update-pragma-sdk.sh scripts configured for your game project. This will automatically create new files in data transfer object (DTO) folders, which represent new custom RPCs in the relevant engine language.
The DTO folders are located in the directories below for Unity and Unreal.
- Unity:
PragmaSDK/src/dto - Unreal:
PragmaSDK/Source/PragmaSDK/Public/Dto
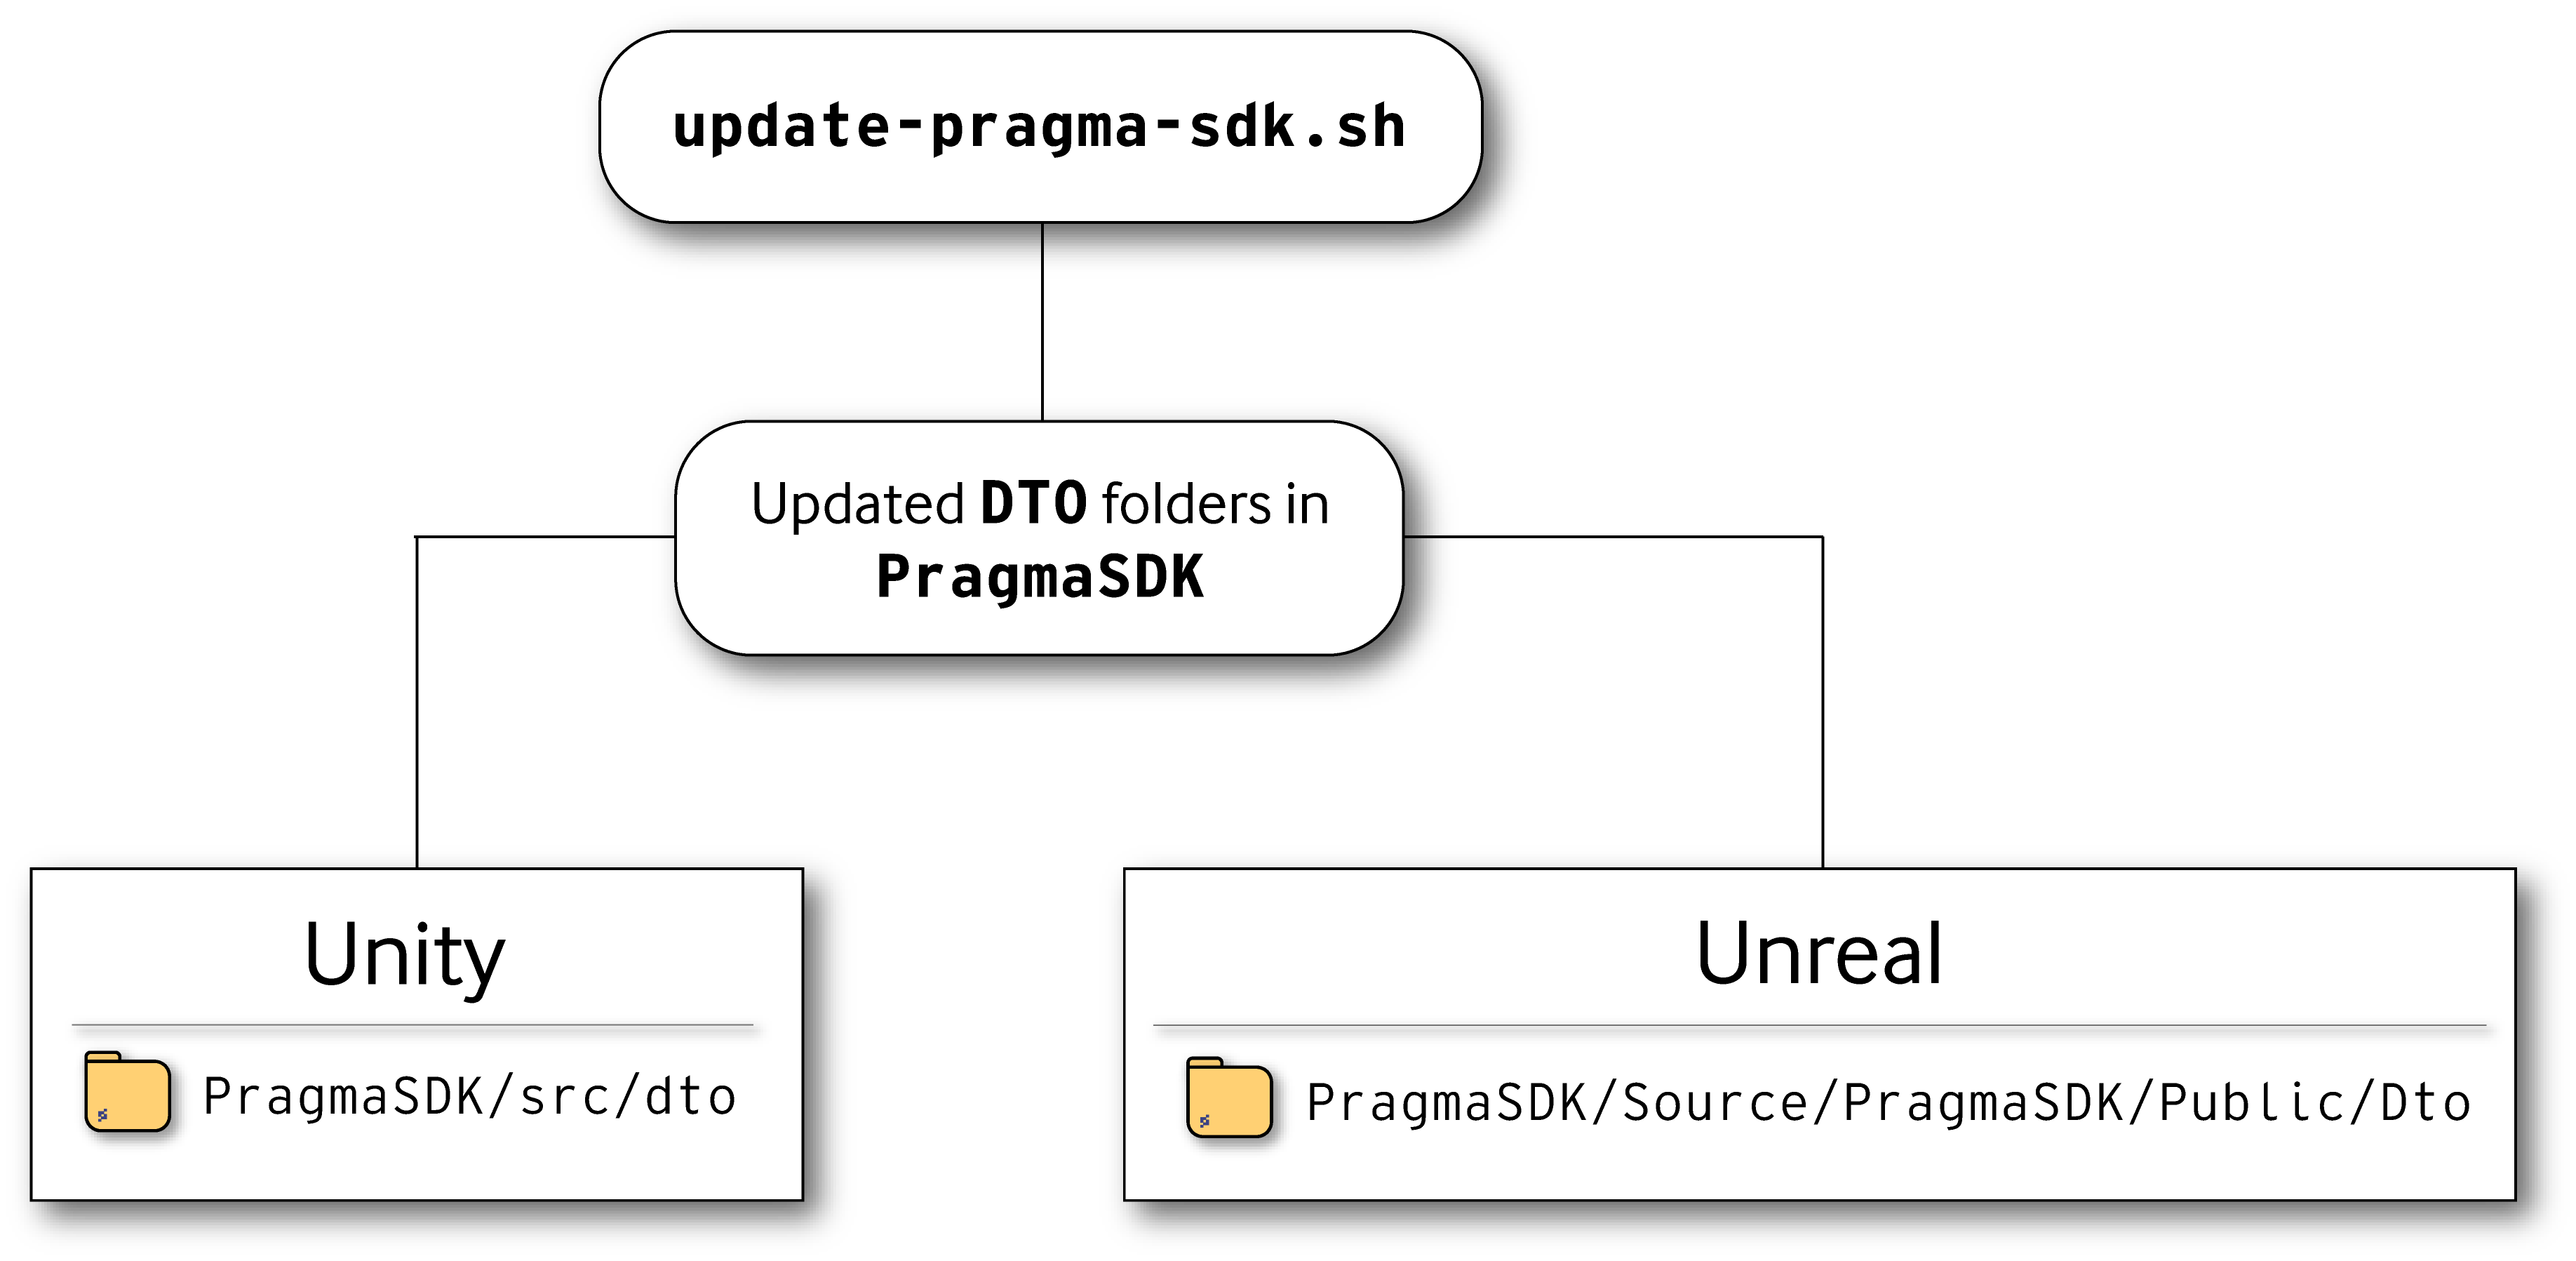
Locations of DTO folders after running update-pragma-sdk.sh.
Once the RPCs are defined in Protos and generated for your SDK, we can get started on building the custom service itself in Kotlin!
Build the custom service in Kotlin #
What your custom service does–and all the service’s code logic–resides in a 5-ext directory and in authored Kotlin files. A custom service can be completely independent or fully integrated with other Pragma Engine systems; you’ll define just how dependent or independent your custom service is using this Kotlin file.
The workflow for creating a custom service in Kotlin.
The next sections in this article will go over all the pieces that need to be defined in Kotlin to create a custom service:
- The directory structure that houses the Kotlin file for the custom service
- The prerequisites required for the service to run
- The custom service’s class which holds the business logic
- The functions and logic that defines externally accessible RPC endpoints using protobufs
Directory #
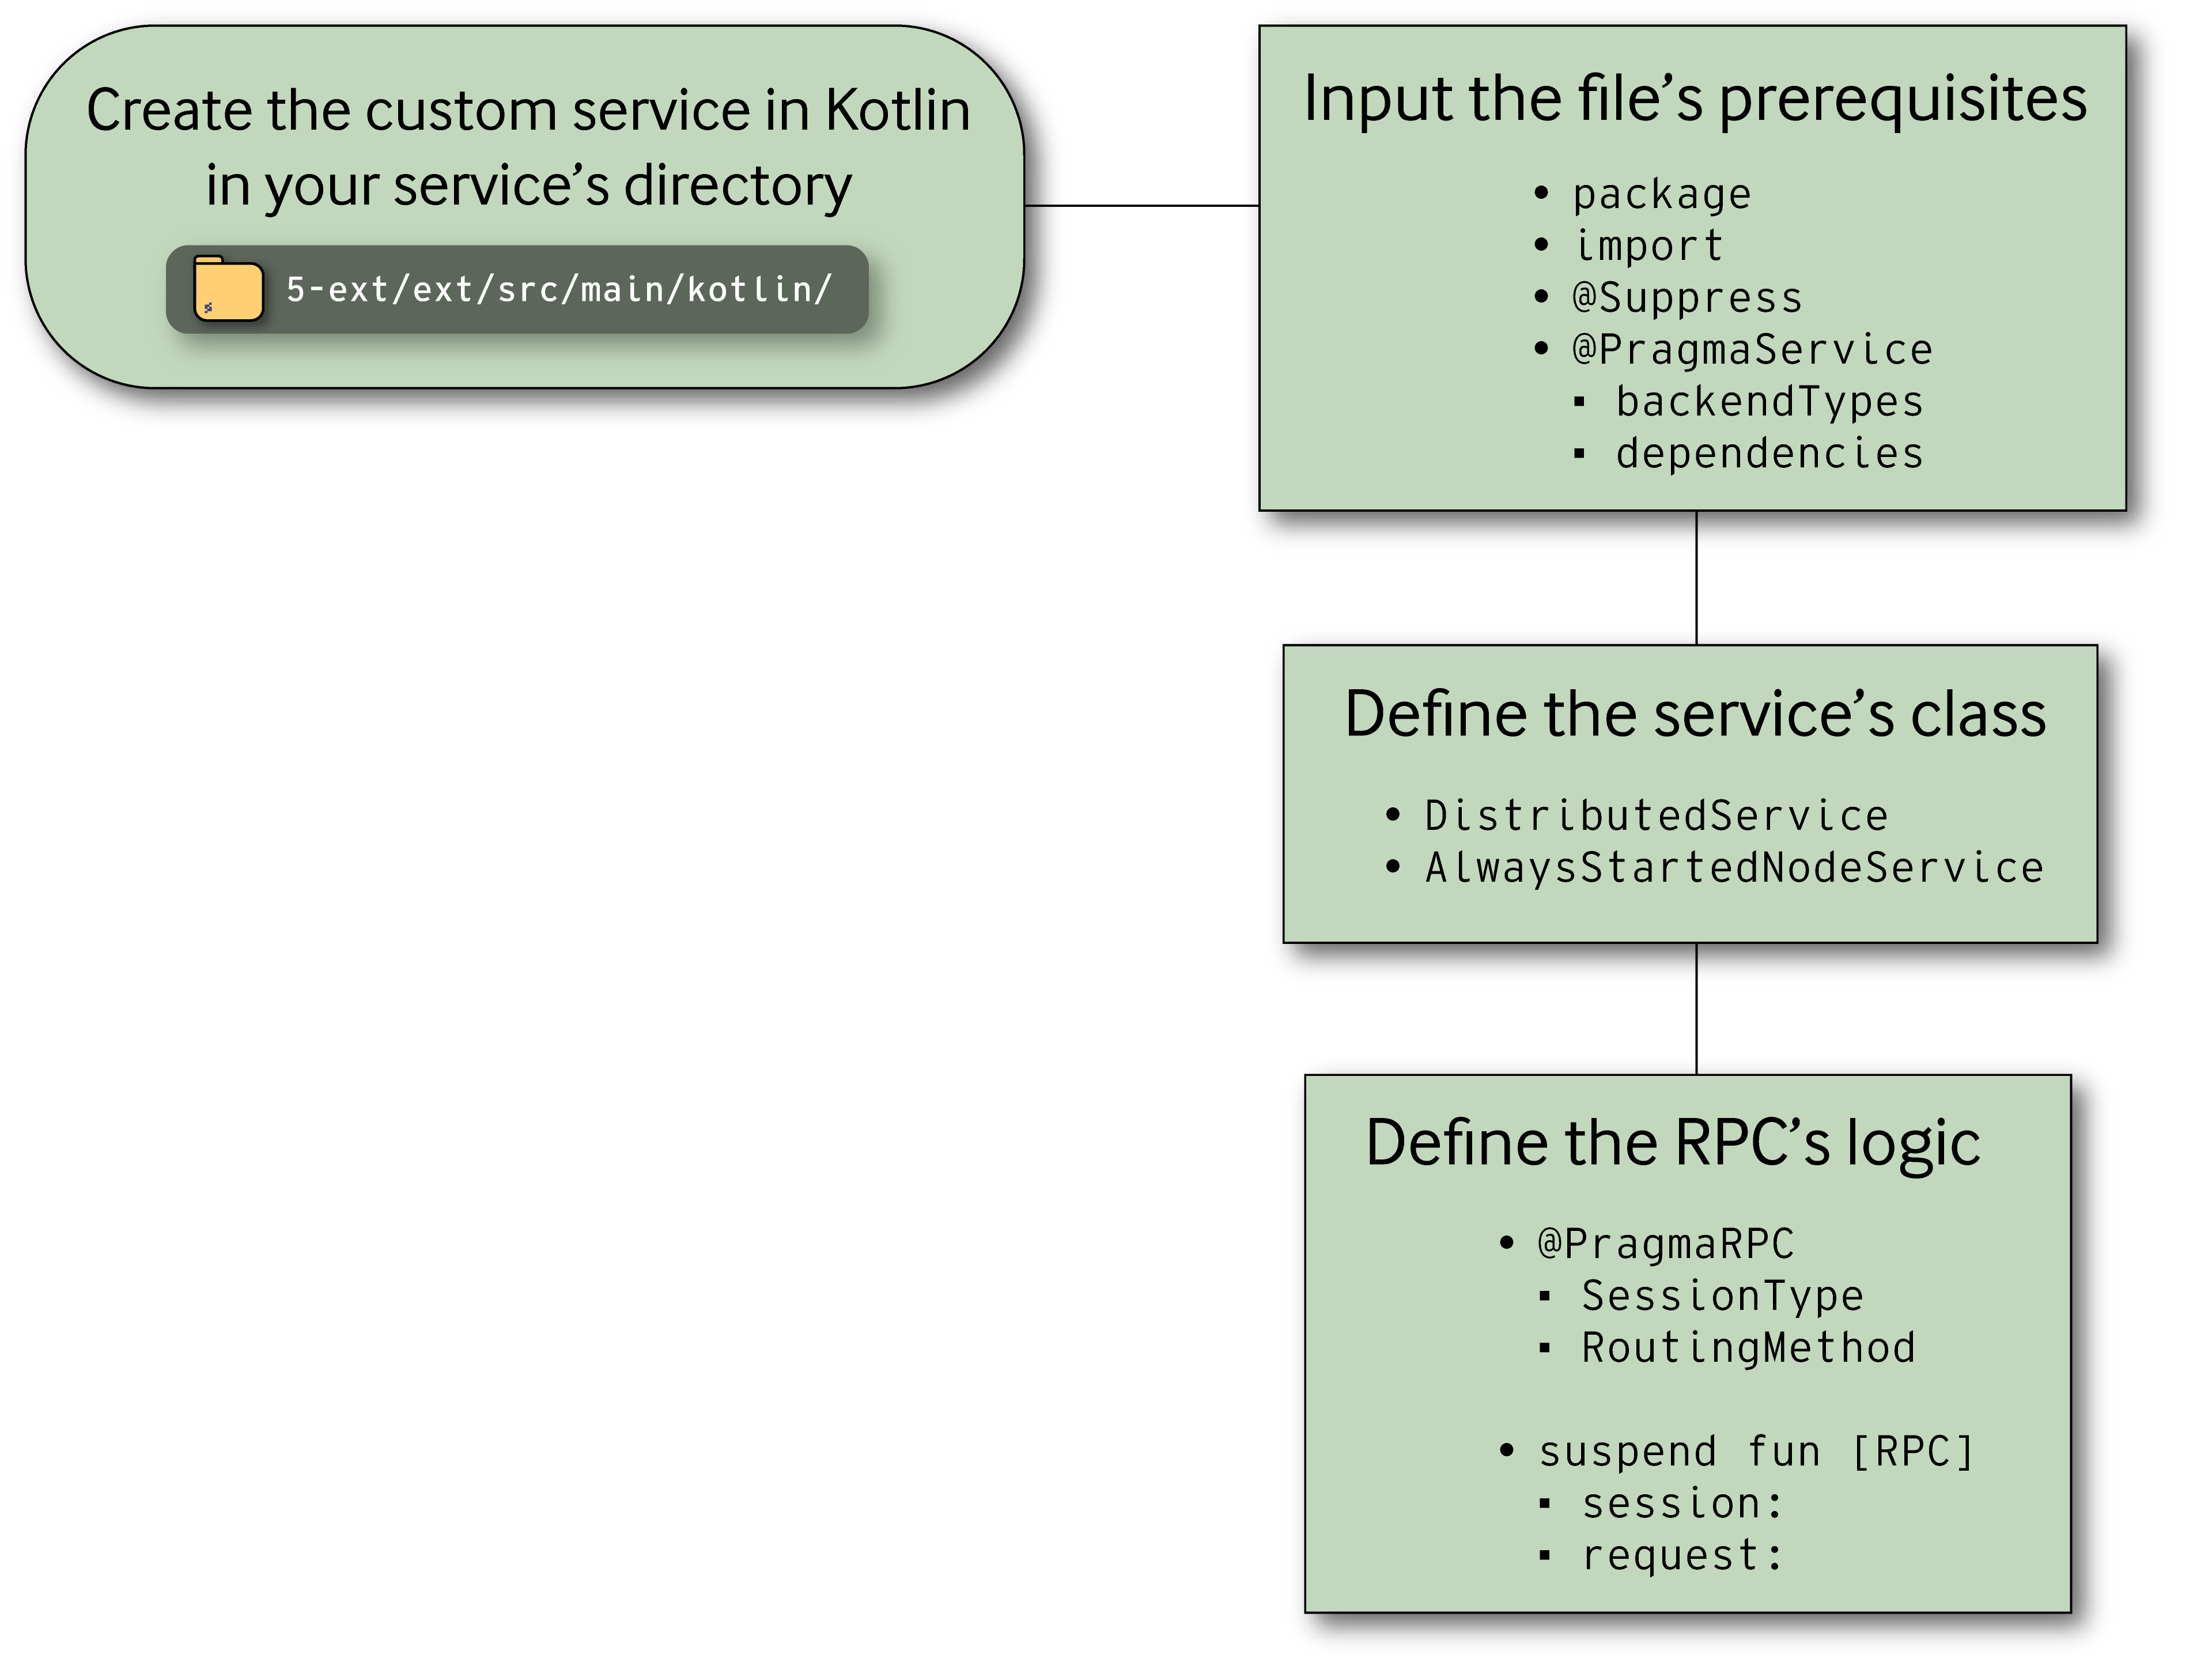
All custom services, alongside any plugins in Pragma Engine, must be created as a Kotlin file in the 5-ext/ext/src/main/kotlin/ directory.
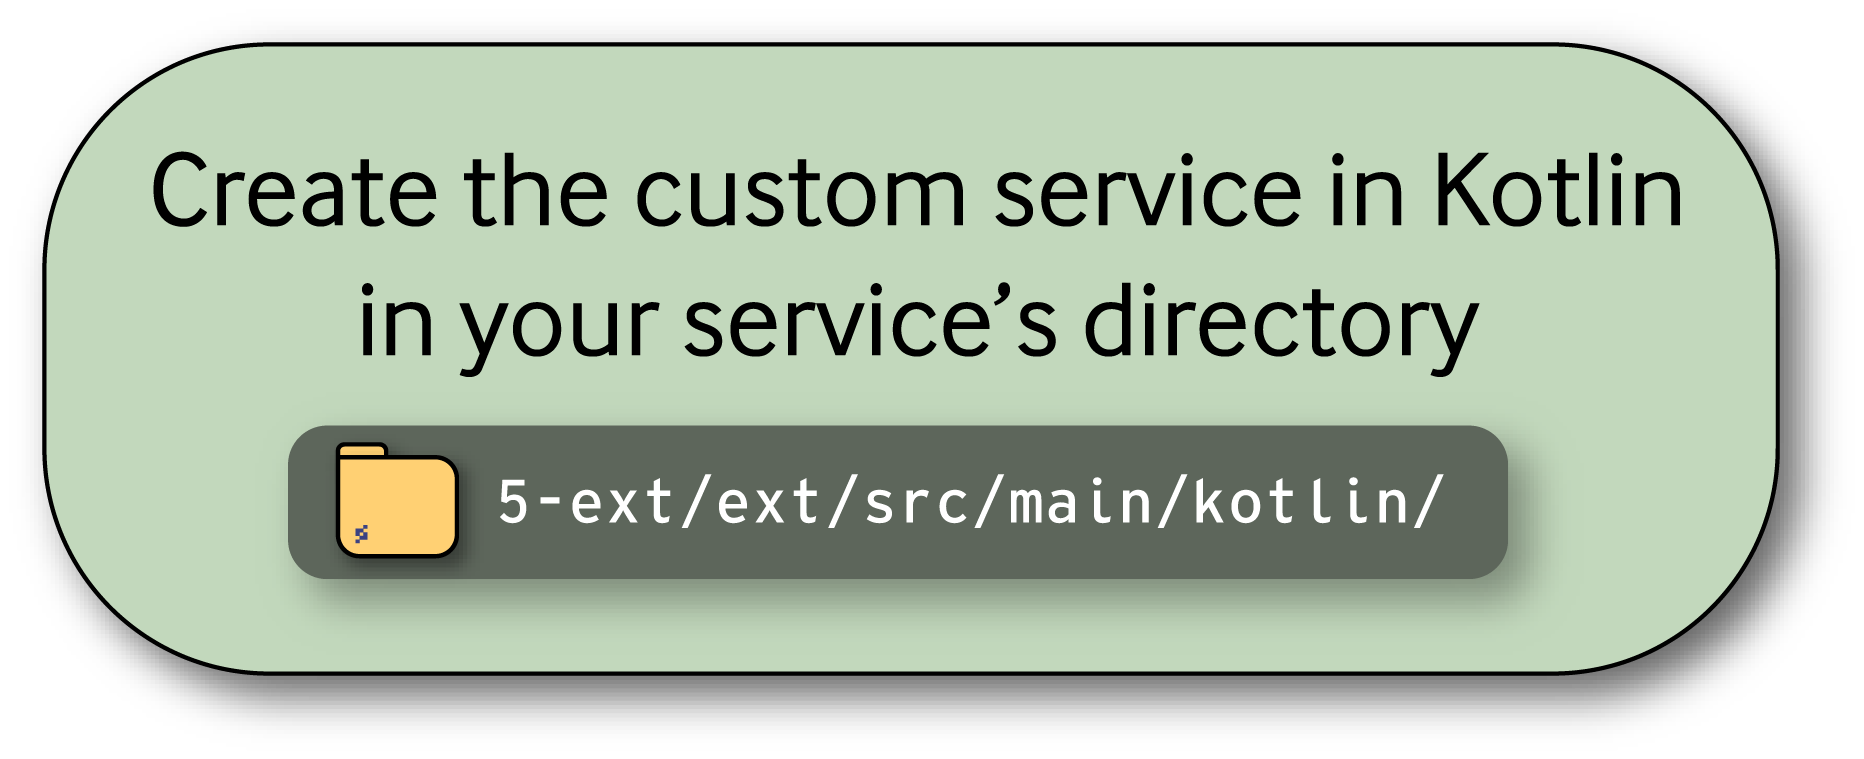
For example, if we were making a custom service called TechBlogEchoCustomService, we’d create the custom service’s Kotlin file in 5-ext/ext/src/main/kotlin/techblog/echo/ with a file name of EchoService.kt.
Prerequisites #
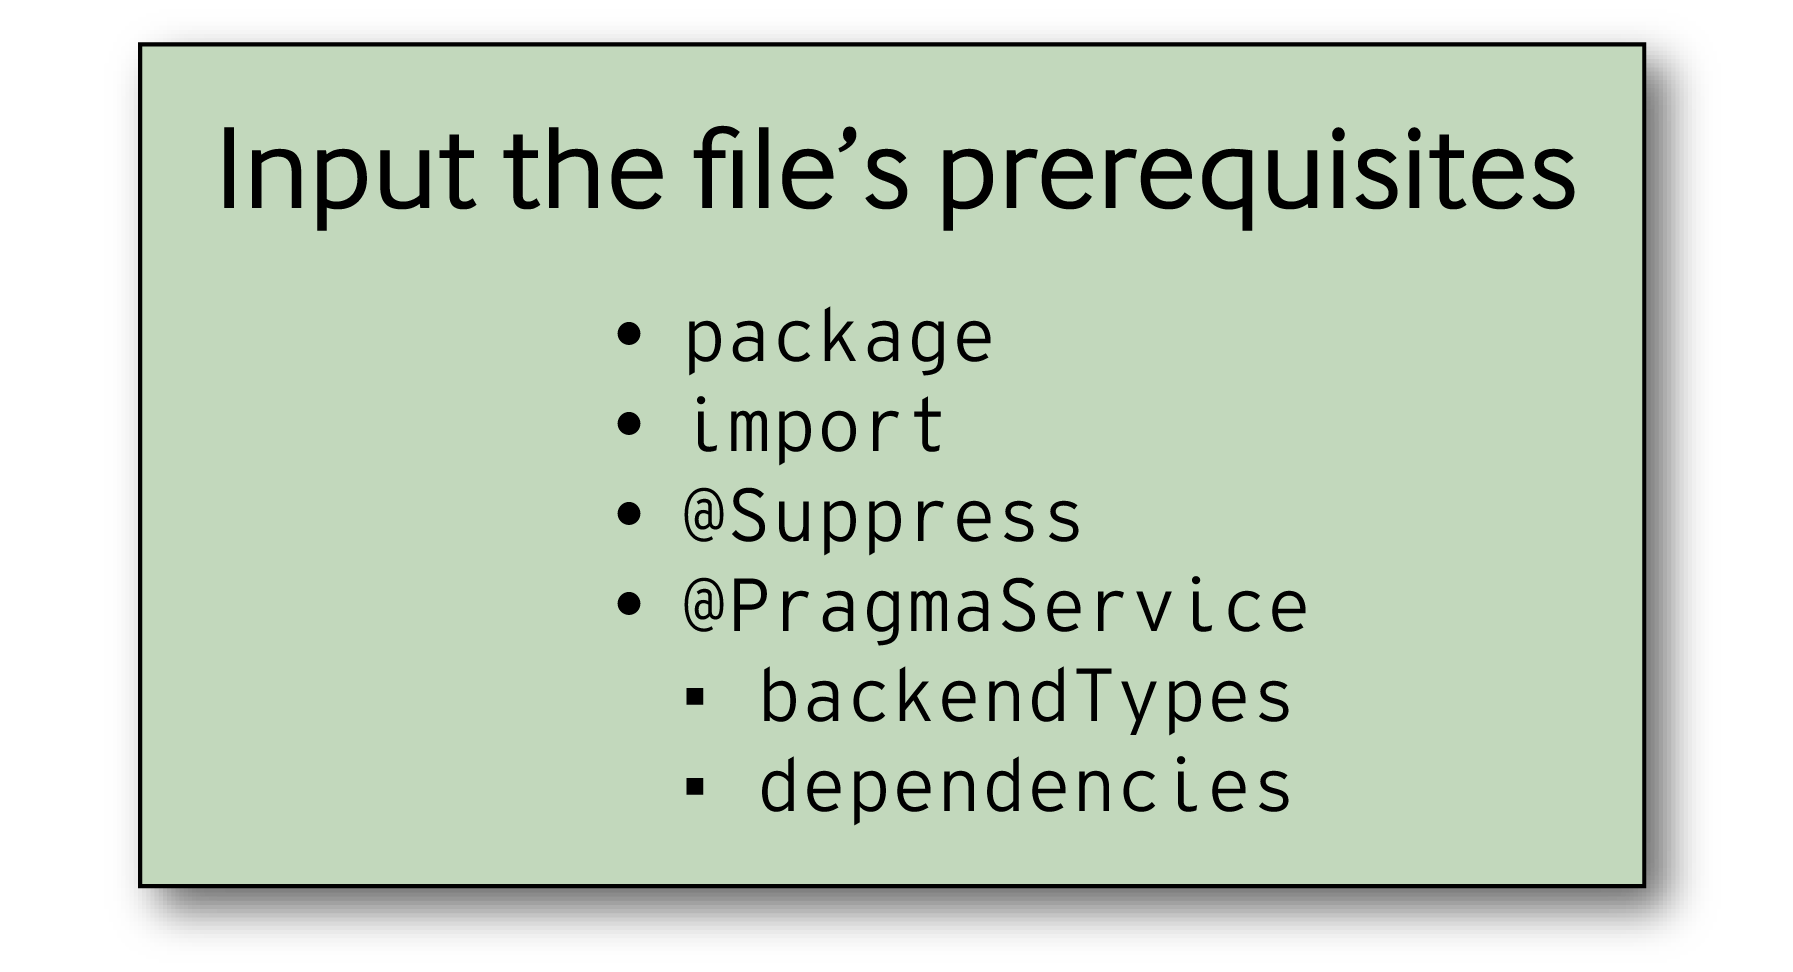
Before defining the class for your custom service, you’ll need to define the file’s necessary prerequisites.
These prerequisite lines of code will be the custom service’s package–the collection or directory of Kotlin files grouped in with your service–and any required file imports that your custom service’s code logic will use. Usually these imports will be from other kotlin or java packages.
Once all the file’s prerequisites are met, we can start structuring and defining our custom service’s logic.
All custom services must have the following two annotations at the beginning of the service:
@Suppressprevents erroneous IDE error messages that may occur when the file is called to run.@PragmaServicedefines what backend type the custom service is used for–GAMEand/orSOCIAL–and any dependencies that should be injected into the file at the start and middle of the service’s runtime.
The @Suppress annotation is written by including any incorrect IDE errors, or errors about variance conflict in the annotations parameters (usually pertaining to a language feature). For example, "UNUSED_PARAMETER" and "RedundantSuspendModifier" are fairly common errors that will need to be ignored using @Suppress.
When defining the @PragmaService, there are two parameters available for defining the backend types and dependencies you want your service to support:
backendTypesdefines whether the custom service is part of Pragma’sGAMEorSOCIALfeatures.dependenciesis used to register any required classes, services, and other dependencies required. Usually these are specificNodeServices authored by the user.
Below is an example of @Suppress and @PragmaService in action before a defined custom service class; the custom service uses BackendType.GAME and requires a custom TechBlogDaoNodeService class as defined in the parameters of @PragmaService.
@Suppress("UNUSED_PARAMETER", "RedundantSuspendModifier")
@PragmaService(
    backendTypes = [BackendType.GAME],
    dependencies = [TechBlogDaoNodeService::class]
)
Now that we have the custom service’s prerequisites written, we can define the service’s class and functions.
Class #
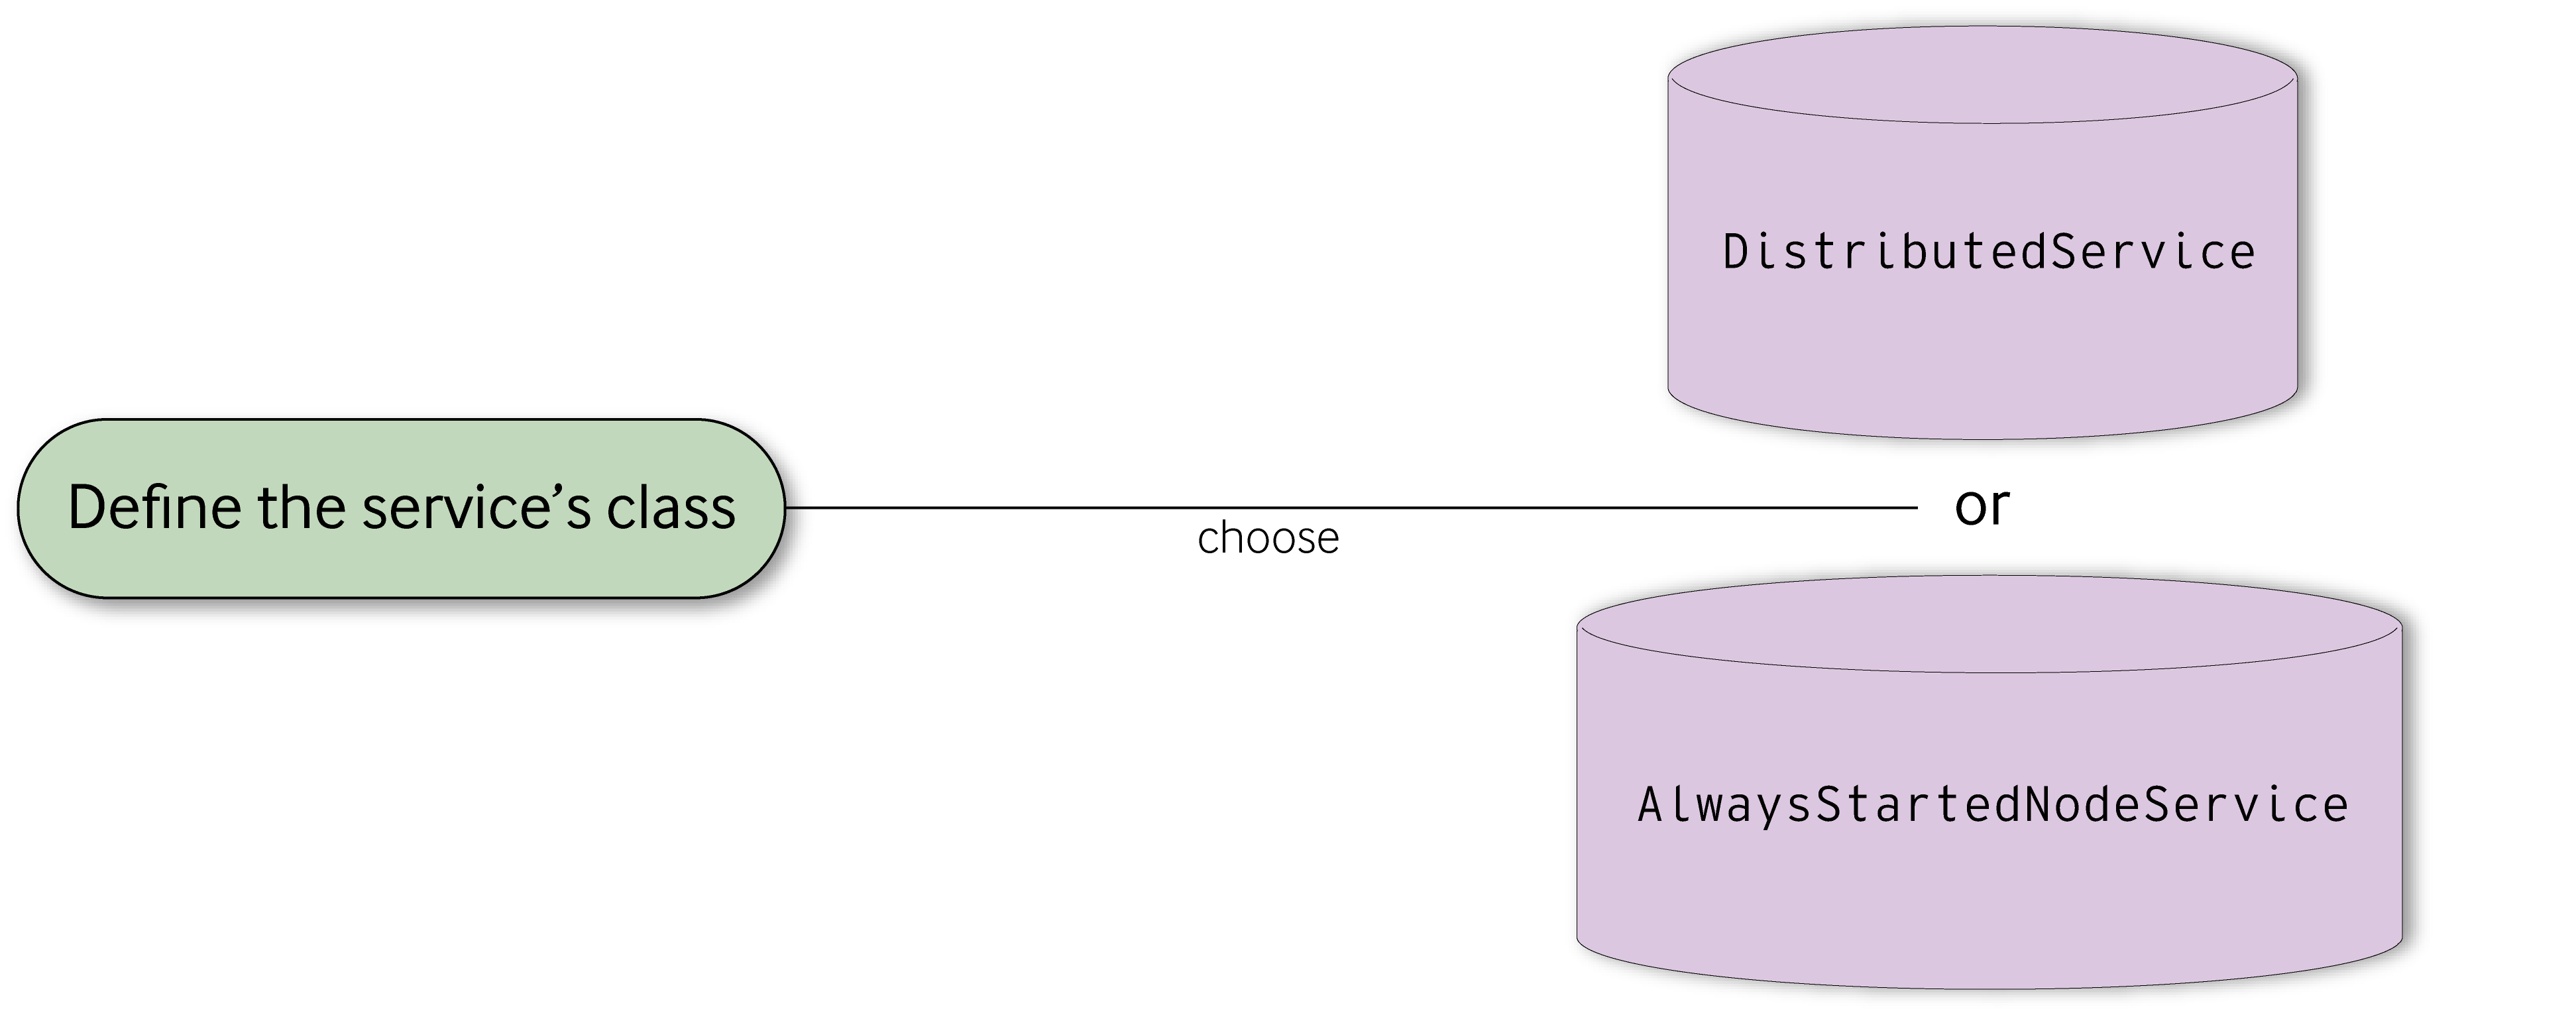
To start building your custom service’s logic, define the custom service’s class with a pragmaNode and an instanceId parameter. Then, classify the custom service from two existing service classes:
DistributedServicesare used for scalable systems and can be enabled and disabled across many different Pragma Nodes and instances. MostGAMEandSOCIALservices fall underDistributedServices. These include examples such as theInventoryService,AccountService,MatchmakingService,PartyService,GameDataService, and many, many more.AlwaysStartedNodeServicesare common across all nodes in the engine and aren’t restricted to one specific instance. Two services that operate like this areLoggingNodeServiceandMetricsNodeService, as they access all sorts of nodes and data throughout the engine.
Choosing the two service classes for a custom service.
By default, you’ll usually extend your custom service from the DistributedService due to its practicality and common use cases. However, on rare occasions, the AlwaysStartedNodeService is the more practical and necessary solution–such as if you’re running services and data on a single node use and require using one instance of the same resource.
It’s important to note that DistributedService uses pragmaNode and instanceId as its parameters, while AlwaysStartedNodeService only uses pragmaNode due to its focus on running data on and from a single node.
Below is an example of a custom service class defined with an extension from the DistributedService class. Remember that before this class definition we’ll have the @Suppress() and @PragmaService() annotations with their respective parameters and definitions.
class TechBlogEchoCustomService(pragmaNode: PragmaNode, instanceId: UUID):
    DistributedService(pragmaNode, instanceId)
{}
Functions and Logic #
Once you’ve defined the custom service’s class, we’ll write all the service’s functions within it. These functions will be defined as externally accessible RPC endpoints using the protobufs in the previous section. Once these RPCs are defined in our custom service’s class, they’ll be externally accessible by other services and your PragmaSDK.
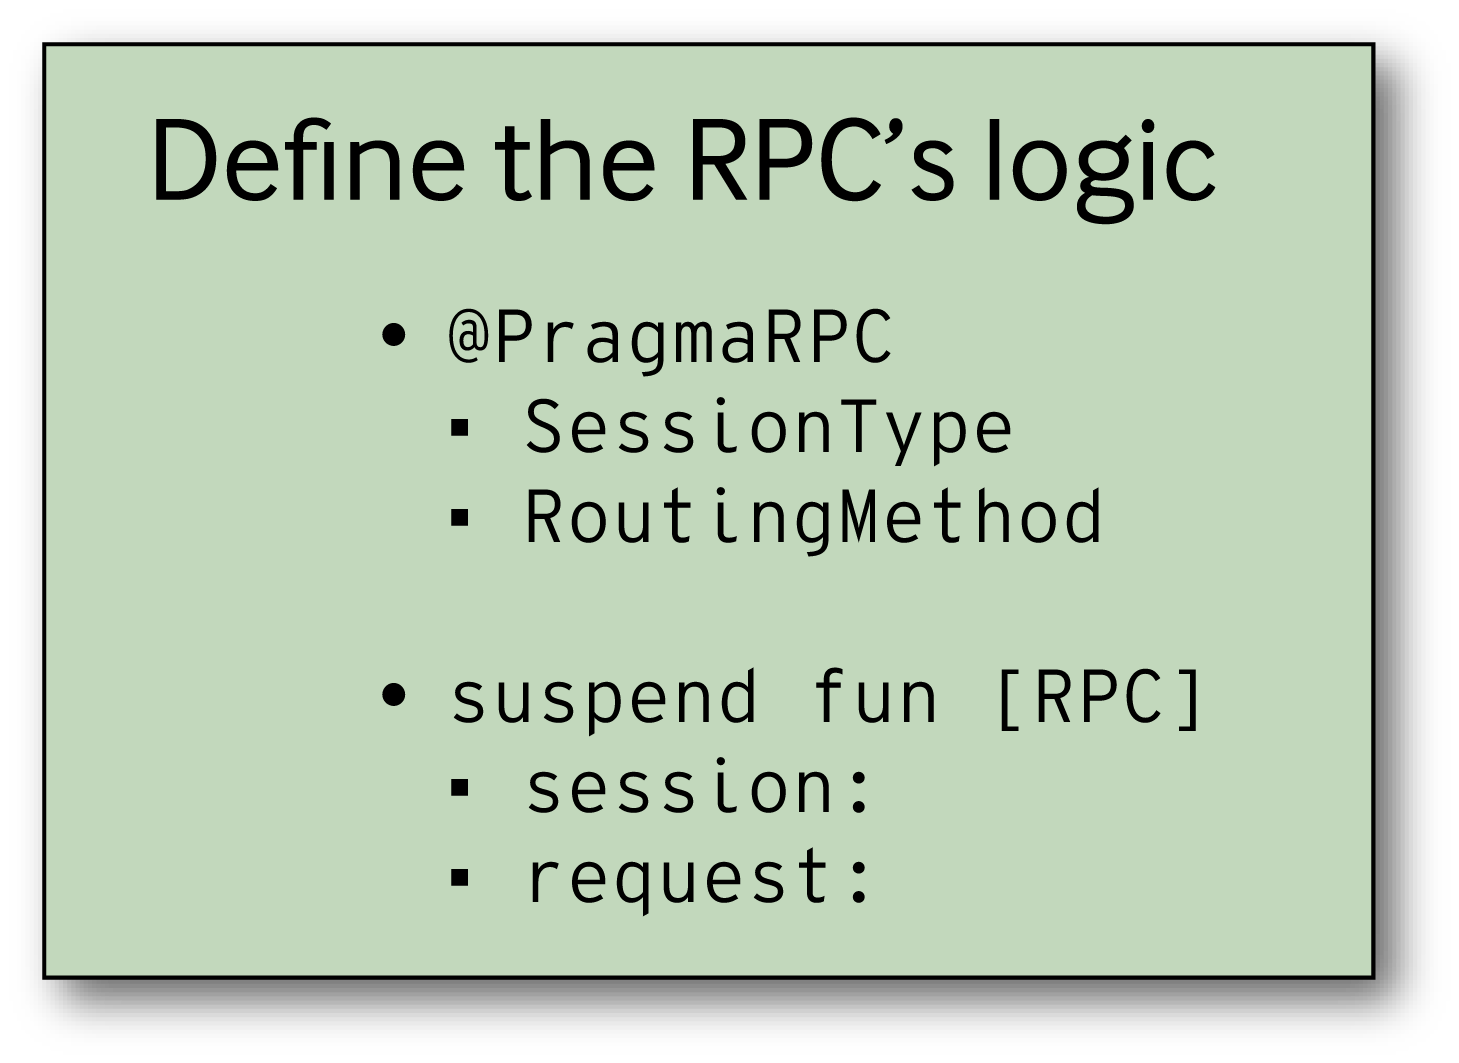
When defining your custom service’s RPC endpoints, you must start with the @PragmaRPC annotation. Then, inside @PragmaRPC, you’ll define two important properties for the RPC: sessionType, which uses the same 4 session types used when defining our RPCs in protos, and routingMethod.
routingMethod defines the rules for how RPC requests are routed to the desired service instance. There are seven different routing methods available, though by default, we recommend using SESSION_PRAGMA_ID for all RPCs for player-facing services.
| Routing Method | Definition |
|---|---|
RANDOM | Acquires any service instance or session database; randomly chosen and distributed. Example: simulateRewardsV2 uses this routing method to choose a random reward for players from a select database. |
REQUEST_FIELD | Determines the service instance to use based on a user-defined protobuf field. This annotation requires another property called protoRoutingFieldName, which is the name of the specific field used in the RPC protos to determine which service instance to route to.Example: MatchEndV4 uses this routing method to request player_Ids to acquire MatchEnd data. |
SINGLETON | Always routes to a single, specific service instance every time. Example: enterMatchmakingV2 uses this routing method, as everyone needs to get into the same matchmaking queue when starting matchmaking. |
DIRECT | Routes directly to any service instance, usually used when knowing specific session instances on the same service. This routing method is very uncommon. |
GAME_SESSION_PARAM | Utilizes game session attributes for routing.Example: many RPCs in the Party service use GAME_SESSION_PARAM to route players in separate game sessions into the same server. |
SOCIAL_SESSION_PARAM | Utilizes social session attributes for routing.Example: the Party service uses this routing method to look into players’ separate social sessions and route them into the same server. |
SESSION_PRAGMA_ID | Similar to REQUEST_FIELD, as it routes using a player’s PragmaId. It’s useful for keeping a player in the same pragma session when using a particular call or service.Example: the Inventory service frequently uses this routing method to keep players in the same pragma session when dealing with their inventory, items, and store purchases. |
Once you’ve fully fleshed out @PragmaRPC with sessionType and routingMethod, use a suspend fun() with the exact name used from your protobuf RPC and exact proto message fields for the function’s parameters. Then define the rest of the RPCs logic for both the request or response call.
To see a custom service’s RPC logic defined using the instructions above, check out the code block below for a custom Echo service. It defines an RPC that uses the PLAYER sessionType, SESSION_PRAGMA_ID as the routingMethod, as well as the suspend fun() detailing the call’s unique logic.
    @PragmaRPC(
        SessionType.PLAYER,
        RoutingMethod.SESSION_PRAGMA_ID
    )

    suspend fun echoV1(
        session: PlayerSession,
        request: Echoservice.EchoV1Request
    ): Echoservice.EchoV1Response {
        val message = request.message
        return Echoservice.EchoV1Response.newBuilder().setResponseMessage("response:$message").build()
        }
Make ext with the custom plugin #
Once you’ve fully built out the logic of your custom service, you’ll need to run the following make command to get your 5-ext directory created with the custom service in place.
make ext
And that’s how you fully build out the logic of your custom service! All that’s left is to define the corresponding structure on the client-side.
Before we move on, there’s one thing that you should always consider when creating your own services in Pragma Engine.
Writing custom services with scaling in mind #
Distributed services are varied and diverse, and can exist as a single instance, as multiple instances on a single server, or as multiple instances on multiple servers. Because of this, you might initially think of your custom service existing as something singular, but in reality it may need to be updated for future and more complex service behavior. In other words, when making your own custom distributed service, make sure you take into account your intended scaling approach.
This topic greatly relies on how you intend to use your Pragma Engine and custom services, and can be very advanced or unnecessary for simpler custom services. To learn more about some good common practices when writing your own services, features, and data, check out our Concurrency page for more information.
Now that a custom service is built on the server side–in protos and Kotlin–we can create the necessary client-side structures to interact with our custom service and RPCs via the PragmaSDK.
Create the corresponding structure on the client-side #
Before we implement a custom service on the client-side, let’s explain how provided services in Pragma Engine operate in the SDK. We’ll be using code snippet examples from a MyCustomTechBlogService to demonstrate what an integrated custom service looks like in the PragmaSDK. Whenever you create your own custom service, we recommend creating the methods and logic for your custom services and its RPCs similarly to Pragma’s provided ones.
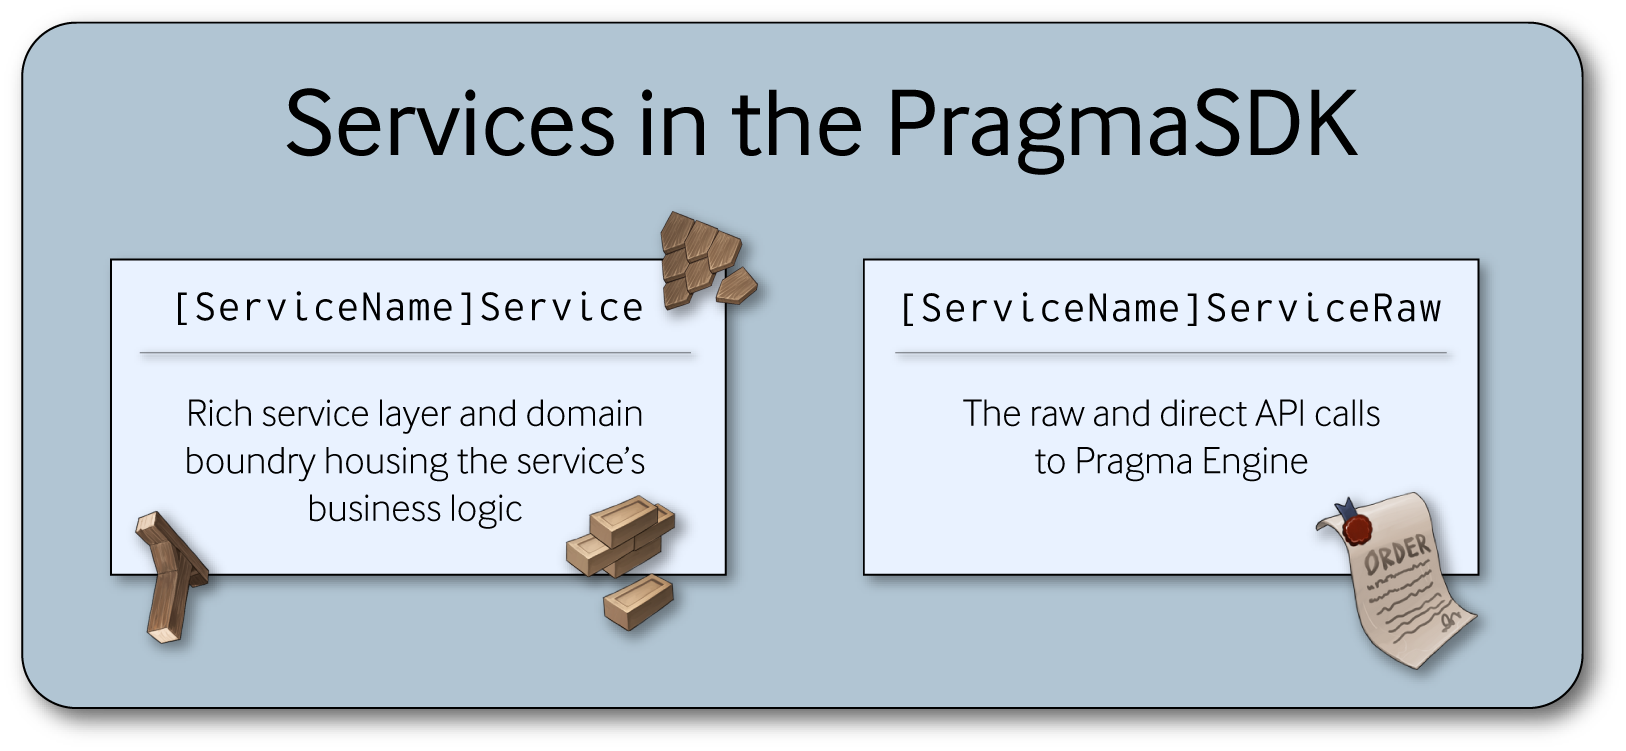
The two class files for a custom service in the PragmaSDK.
In the PragmaSDK, all provided Pragma Engine services come with two important class files: [ServiceName]Service and [ServiceName]ServiceRaw.
[ServiceName]Serviceis the rich service layer that creates a domain boundary between your game code and the APIs. This class houses most of the service’s business logic for your SDK. It includes functionality like caching states and automatic delta applications.[ServiceName]ServiceRawhouses raw, direct API calls to Pragma Engine for provided Pragma Engine services.
When creating the methods and logic that will interact with your custom service and its RPCs on the client-side, it’s best practice to separate API and DTO definitions from your game’s application logic, similarly to how we have a Service and a ServiceRaw class for provided services. This way, when applying new SDK updates, any errors caused by new changes won’t cause cascading breakages across your game’s code.
To separate your API method definitions from your game’s application logic, create and house all your custom service’s API and DTO logic in a Raw service class in your dto directory. If your custom services require, we recommend creating a separate [ServiceName]Service file to house the rest of your service’s business logic in the SDK.
If you’re using Unreal Engine, then all your Raw service files are generated automatically! They can be found in the PragmaSDK/Source/PragmaSDK/Public/Dto directory alongside the RPC DTOs. If you’re using Unity, you’ll need to generate or author the Raw file manually.
Below is an example of a newly created MyCustomTechBlogServiceRaw.cs file written in C# for Unity. It includes a single RPC called MyCustomRpc and a single notification called MyCustomNotification.
public class MyCustomTechBlogServiceRaw : Service
{
    // RPC Calls.

    public virtual void MyCustomRpc(MyCustomRpcV1Request request, Protocol.OnComplete<MyCustomRpcV1Response> callback)
    {
        Connection.Game.SendMessage(request, callback);
    }


    // Alternative format if you prefer using futures.

    public RpcFuture<MyCustomRpcV1Response> MyCustomRpc(MyCustomRpcV1Request request)
    {
        return Connection.Game.SendMessage<MyCustomRpcV1Request, MyCustomRpcV1Response>(request);
    }

    // Notifications.

    public event Protocol.OnNotification<MyCustomNotification> OnMyCustomNotification;

    protected override void OnConnectionInitialized()
    {
        Connection.Game.AddNotificationHandler<MyCustomNotification>((notification, metadata) =>
            OnMyCustomNotification?.Invoke(notification, metadata));
    }
}
Registering a custom service #
A custom service’s [ServiceName]Service and [ServiceName]ServiceRaw classes must be registered in the SDK using the RegisterService() method. You can use this method with the client’s Runtime or register it with the player or server session objects. We highly recommend using Runtime to register your custom service, since whenever you create a player or server, it’s through the runtime.
For custom services, define the registration method for both the [ServiceName]Service and [ServiceName]ServiceRaw classes to attach the service properly.
The line of code below demonstrates a registered MyCustomTechBlogServiceRaw class once through Runtime and once not through Runtime. Remember that if you don’t register your service through Runtime, you’ll need to register the two custom service classes with the player or server object.
// registering through Runtime

Runtime.Get().RegisterService<MyCustomTechBlogServiceRaw>();

// registering not through Runtime

player.RegisterService<MyCustomTechBlogServiceRaw>();
Retrieving a custom service #
Using the GetService() method, a registered service can be retrieved anywhere from the service’s session when the [ServiceName]Service class needs to communicate with the SDK. You can also use the GetService() method to get a registered service of any type, such as Pragma-provided ones like the AccountService and InventoryService.
Below is an example of a myCustomTechBlogService calling the MyCustomTechBlogServiceRaw file using the GetService() method:
var myCustomTechBlogService = session.GetService<MyCustomTechBlogServiceRaw>();
Any time you update your custom service’s RPCs, you’ll also need to add and update the methods in your[ServiceName]Serviceand[ServiceName]ServiceRawclass in the SDK.
Utilizing the custom service #
Once you’ve registered your custom service, you can retrieve it, make RPC calls, and bind it to notification events however you’d like in your game code.
And that’s how you fully define your custom service in protos, Kotlin, and your PragmaSDK. There are plenty of additional options available to you when designing your custom service, which we’ll get into in the next article by enabling database storage for custom services.
For more information, check out the rest of the articles in this series:
Part I: Introduction to Custom Services
Part II: Creating a Custom Service (this article)
Part III: Using Database Storage for Custom Services
Part IV: Integrating Custom Services with Provided Services
%22/%3E%3Cpath%20d=%22M82%20113.698c1.821%201.063%201.834%202.78.0%203.843l-13.084%207.687a7.17%207.17.0%2001-3.284.798%207.17%207.17.0%2001-3.284-.798l-13.16-7.687c-1.821-1.063-1.834-2.78.0-3.843l13.084-7.687a7.168%207.168.0%20016.568.0L82%20113.698z%22%20fill=%22url(%23b)%22/%3E%3Cpath%20d=%22M73.16%20114.658a.985.985.0%2001.487.368%201.037%201.037.0%20010%201.186.981.981.0%2001-.486.369l-6.383%203.846a3.438%203.438.0%2001-3.198.0l-6.42-3.846a.982.982.0%2001-.486-.369%201.035%201.035.0%20010-1.186.986.986.0%2001.486-.368l6.383-3.846a3.438%203.438.0%20013.198.0l6.42%203.846z%22%20fill=%22%23fff%22/%3E%3Cpath%20d=%22M111%2048c-1.455-.642-37.943-12.532-45.55-14.5-7.607%202.022-43.495%2016.358-44.95%2017l37.504%2065.718c.106.239.291.435.524.556l5.542%203.209a3.038%203.038.0%20002.76.0l5.51-3.209c.25-.123.441-.338.535-.599L111%2048z%22%20fill=%22url(%23c)%22/%3E%3Cpath%20fill-rule=%22evenodd%22%20clip-rule=%22evenodd%22%20d=%22M109.533%2040.686c-6.925%203.665-17.69%203.562-24.4-.311-6.892-3.98-6.892-10.431.0-14.41%201.422-.822%203.026-1.473%204.737-1.955-17.595-6.637-41.42-5.496-56.87%203.424-17.72%2010.23-17.72%2026.815.0%2037.044%2017.719%2010.23%2046.447%2010.23%2064.167.0%2011.194-6.462%2015.316-15.461%2012.366-23.792z%22%20fill=%22url(%23d)%22/%3E%3Cg%20opacity=%22.7%22%20filter=%22url(%23e)%22%3E%3Ccircle%20r=%2237.046%22%20transform=%22scale(1.22477%20.70706)%20rotate(45%20-55.303%2098.057)%22%20fill=%22url(%23f)%22/%3E%3C/g%3E%3Cpath%20fill-rule=%22evenodd%22%20clip-rule=%22evenodd%22%20d=%22M96.321%2027.615a8.615%208.615.0%2001-2.019-.824c-2.848-1.644-2.848-4.31.0-5.954%201.296-.748%202.958-1.156%204.653-1.223a41.764%2041.764.0%2000-1.788-1.092c-17.72-10.23-46.448-10.23-64.168.0-17.72%2010.23-17.72%2026.814.0%2037.044s46.448%2010.23%2064.168.0c8.025-4.633%2012.416-10.57%2013.172-16.63-4.598%201.417-10.442%201.007-14.318-1.23-4.746-2.74-4.746-7.183.0-9.923.099-.057.199-.113.3-.168zm9.666-1.923a2.064%202.064.0%2001-.068.076l.139.01c-.023-.03-.047-.058-.071-.086z%22%20fill=%22url(%23g)%22/%3E%3Ccircle%20r=%222%22%20transform=%22matrix(.86604%20.49997%20-.86604%20.49997%2062.464%2051)%22%20fill=%22%23121212%22/%3E%3Ccircle%20r=%222%22%20transform=%22matrix(.86604%20.49997%20-.86604%20.49997%2081.464%2045)%22%20fill=%22%23121212%22/%3E%3Ccircle%20r=%222%22%20transform=%22matrix(.86604%20.49997%20-.86604%20.49997%2043.642%2031)%22%20fill=%22%23121212%22/%3E%3Ccircle%20r=%222%22%20transform=%22matrix(.86604%20.49997%20-.86604%20.49997%2039.464%2045)%22%20fill=%22%23121212%22/%3E%3Ccircle%20r=%222%22%20transform=%22scale(1.22477%20.70706)%20rotate(45%20-12.95%2084.623)%22%20fill=%22%23121212%22/%3E%3Ccircle%20r=%222%22%20transform=%22matrix(.86604%20.49997%20-.86604%20.49997%2062.464%2035)%22%20fill=%22%23121212%22/%3E%3Cdefs%3E%3ClinearGradient%20id=%22a%22%20x1=%2265.415%22%20y1=%22133.384%22%20x2=%2262.707%22%20y2=%22116.141%22%20gradientUnits=%22userSpaceOnUse%22%3E%3Cstop%20stop-color=%22%23bebebe%22/%3E%3Cstop%20offset=%221%22%20stop-color=%22%23fff%22/%3E%3C/linearGradient%3E%3ClinearGradient%20id=%22b%22%20x1=%2265.415%22%20y1=%22126.531%22%20x2=%2257.672%22%20y2=%22104.287%22%20gradientUnits=%22userSpaceOnUse%22%3E%3Cstop%20stop-color=%22%23bebebe%22/%3E%3Cstop%20offset=%221%22%20stop-color=%22%23fff%22/%3E%3C/linearGradient%3E%3ClinearGradient%20id=%22c%22%20x1=%2265.409%22%20y1=%22107.427%22%20x2=%2265.409%22%20y2=%2274.173%22%20gradientUnits=%22userSpaceOnUse%22%3E%3Cstop%20stop-color=%22%23fff%22%20stop-opacity=%22.72%22/%3E%3Cstop%20offset=%221%22%20stop-color=%22%23fff%22%20stop-opacity=%220%22/%3E%3C/linearGradient%3E%3ClinearGradient%20id=%22d%22%20x1=%2265.007%22%20y1=%2270.496%22%20x2=%2261.493%22%20y2=%22.477%22%20gradientUnits=%22userSpaceOnUse%22%3E%3Cstop%20stop-color=%22%23edf2f9%22/%3E%3Cstop%20offset=%221%22%20stop-color=%22%23fff%22%20stop-opacity=%220%22/%3E%3C/linearGradient%3E%3ClinearGradient%20id=%22f%22%20x1=%2270.425%22%20y1=%2221.274%22%20x2=%22-.284%22%20y2=%2248.41%22%20gradientUnits=%22userSpaceOnUse%22%3E%3Cstop%20stop-color=%22%231efff1%22/%3E%3Cstop%20offset=%221%22%20stop-color=%22%231548ff%22/%3E%3C/linearGradient%3E%3ClinearGradient%20id=%22g%22%20x1=%2220.05%22%20y1=%2263.78%22%20x2=%2255.07%22%20y2=%22-9.969%22%20gradientUnits=%22userSpaceOnUse%22%3E%3Cstop%20offset=%22.156%22%20stop-color=%22%231efff1%22/%3E%3Cstop%20offset=%221%22%20stop-color=%22%231548ff%22/%3E%3C/linearGradient%3E%3Cfilter%20id=%22e%22%20x=%224.71%22%20y=%226.763%22%20width=%22120.747%22%20height=%2282.388%22%20filterUnits=%22userSpaceOnUse%22%20color-interpolation-filters=%22sRGB%22%3E%3CfeFlood%20flood-opacity=%220%22%20result=%22BackgroundImageFix%22/%3E%3CfeBlend%20in=%22SourceGraphic%22%20in2=%22BackgroundImageFix%22%20result=%22shape%22/%3E%3CfeGaussianBlur%20stdDeviation=%227.5%22%20result=%22effect1_foregroundBlur%22/%3E%3C/filter%3E%3C/defs%3E%3C/svg%3E)